
Use this guide for the FreePBX 17 PJSIP workflow. Module versions can change labels, so use the fields shown by your installed version. Do not copy an old chan_sip peer definition or a registration string into PJSIP settings. This is a trunk connection to IllyVoIP, not an extension that registers a desk phone to FreePBX.
Before you begin
This walkthrough uses an IllyVoIP line with password authentication. In SIP Lines, obtain the SIP username, SIP password, server, destination port and transport for your connection. Do not use your Portal email or login password. If the existing line uses IP authentication, do not switch it without checking the devices that depend on it.
You need administrator access to the PBX, a private configuration backup and a working internal extension for testing. An IllyVoIP SIP line connects the PBX to IllyVoIP; an extension connects a staff phone to the PBX. They are not the same account.
Start with one test extension and a destination you control. Do not move the whole office to the new trunk immediately. If the PBX already carries calls, keep the existing route available until the test is complete.
1. Add a PJSIP trunk
In Connectivity → Trunks, add a SIP/PJSIP trunk and give it a clear name, such as IllyVoIP. Open its PJSIP settings and enter your line details. For this password-registration workflow, use outbound authentication and send registration where those selectors are offered. Do not select a no-registration/IP-authentication recipe for a password line.
| Field | Value to use |
|---|---|
| Username / Auth Username | SIP user and authentication identity from your line |
| Secret | SIP password |
| SIP Server / SIP Server Port | Server and destination port supplied for your connection |
| Transport | The matching configured PJSIP transport |
| Context | External incoming-call handling, normally from-trunk; not from-internal |
| Codecs | Only mutually supported audio codecs; keep the media-encryption mode consistent too |
Submit the form and use Apply Config. On an existing PBX, do this in your normal change window and keep a backup. Do not manually edit generated pjsip configuration files: later GUI changes can replace them.
2. Create an outgoing route for a small test
Open Connectivity → Outbound Routes, add a clearly named test route and select the IllyVoIP trunk in its trunk sequence. Start with the number you will test, then add the destination patterns you actually need. Review route order: another earlier matching route can use a different trunk, making it look as though your new trunk is being ignored.
Check every digit transformation. If staff dial a local access prefix, remove only that prefix; do not accidentally strip the country code. If staff already enter international numbers, do not prepend the same country code again. Write down one example as dialed and as sent, and compare it with the call record.
3. Restrict who can use the route
Use the extension/route controls available in your installation. Some permission features depend on installed modules, so do not assume that naming a route Test makes it private. Do not allow external incoming calls into from-internal: that context can make internal features and outgoing routes reachable. Caller-ID pattern matching is not a substitute for securing the source of a call.
4. Add the incoming route
Route your active IllyVoIP number to the SIP line used by this trunk. In Connectivity → Inbound Routes, match the called identifier that actually reaches FreePBX and select a known extension or ring group. A DID match and an incoming CallerID match are different filters: the first is the number being called, the second is who calls it.
Avoid an unrestricted catch-all as the permanent repair for an unknown number format. If one number works and another does not, compare the received identifiers and the Portal destinations. Do not move every number to a new destination just to test one trunk.
5. Diagnose the stage that failed
- Trunk not registered: check credentials, authentication/registration direction and server/transport.
- Registered, but no call uses it: inspect the outbound pattern, transformations, permissions and route order.
- Call reaches FreePBX but does not ring: inspect the inbound DID match and destination extension status.
- Call connects with one-way audio: inspect the network and media configuration, not just the registration password.
If the administrator has Asterisk CLI access, pjsip show registrations is a useful read-only check. FreePBX CDRs and the IllyVoIP call record can then help establish which route was used. Do not restore an old full backup over unrelated recent changes just because a single new route failed.
Audio, caller ID and security
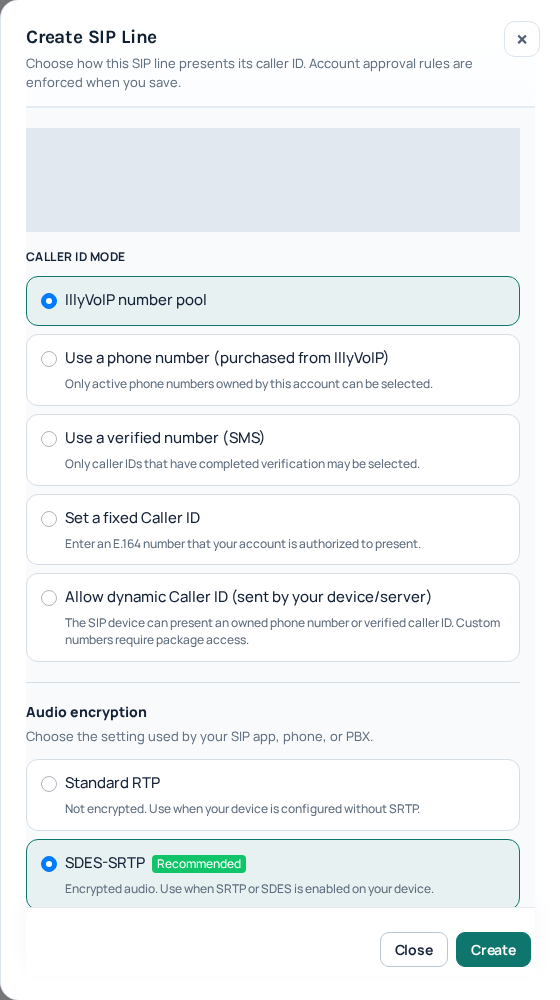
SIP transport and media encryption are separate settings. Match the Portal line’s audio mode to the PBX; Standard RTP, SDES-SRTP and DTLS-SRTP are not interchangeable. Avoid changing transport, codecs and network settings together, because you then lose track of which change fixed or broke the connection.
Use only an outgoing caller ID permitted by your account. Typing a number into the PBX does not verify it. Do not allow anonymous inbound traffic to reach public outbound routes, and do not disable your firewall. If source-IP restrictions are needed, obtain the current permitted addresses for your connection from Support rather than guessing an allowlist.
Acceptance checklist before staff use
- Check trunk registration separately from the test phone’s extension registration.
- Place a call from the chosen extension and confirm which trunk the PBX used. Check balance and rates first; this may be a chargeable test.
- Check two-way audio and the number presented to the recipient. Test keypad digits against a telephone menu you are authorized to use.
- For incoming calls, route an active IllyVoIP number to the PBX SIP line, call it externally and verify the destination inside the PBX.
- Confirm an extension without permission cannot use the test route. Expand staff access only after these checks.
Record the time, timezone, test extension, selected route and public call reference. If something fails, send these details and the PBX model/version to Support. The SIP response-code guide helps describe the failure. Do not post passwords or unredacted logs in public forums.
This guide is based on official documentation and the Portal workflow, not a claim that every PBX version has been tested through a real call. Emergency services and specialist equipment require separate configuration and verification.