
When a PBX already uses IP authentication, moving it to another network can change the public source address IllyVoIP receives. Update the address on the correct additional SIP line as part of the move, then check incoming routing separately. Changing an IP address is not the same as changing a SIP password.
This guide applies to an existing, eligible IP-authenticated additional SIP line. If your device uses a SIP username and password, start with its normal connection settings instead. The main account must remain password protected; do not use it as a workaround when an IP-authentication action is unavailable.
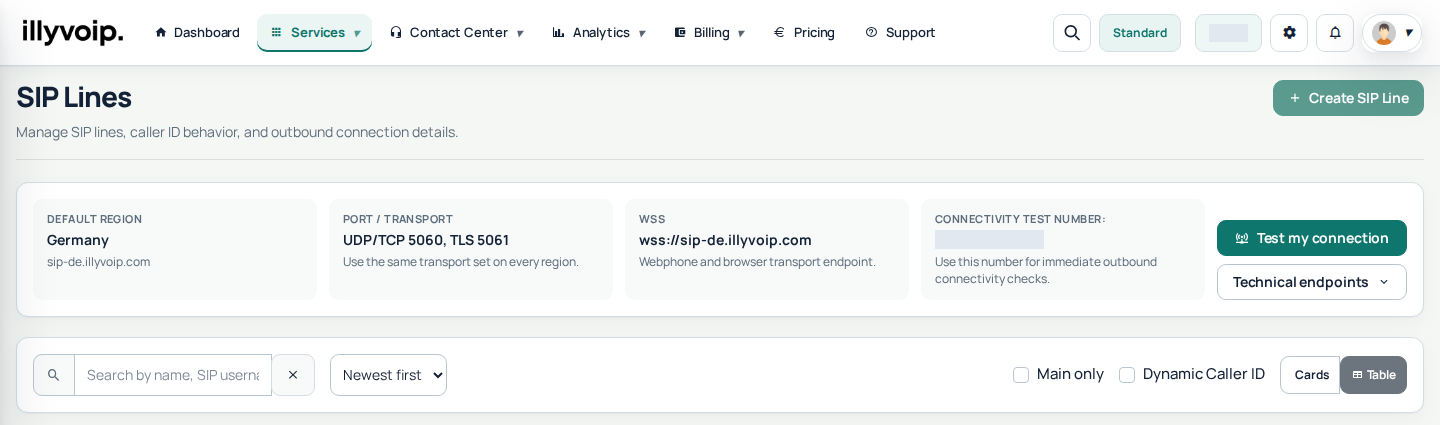
1. Identify the line before touching the network
- Open Services → SIP Lines.
- Find the exact SIP identity used by the PBX. Use its name and identity, not just the first card in the list.
- Check that it already uses IP authentication and note the current configured public address privately.
- Record the PBX’s current IllyVoIP endpoint, transport and audio settings, plus the phone numbers and queues that depend on this line.
Do not expose SIP credentials, customer numbers or network details in a public screenshot. Keep a private copy of the working configuration so you can compare or restore it if necessary.
2. Confirm the new public source address
The required address is the public source IP used by the PBX’s SIP signaling. It is not its private LAN address, the IllyVoIP server address, or necessarily the public address reported by a web browser on another machine.
If the PBX is behind NAT, a VPN, a hosted firewall or multiple Internet connections, ask the network administrator which public address its SIP traffic will use. A failover connection may use a different address. Resolve that uncertainty before changing authentication; do not repeatedly guess addresses in the Portal.
Arrange stable outbound addressing if you depend on IP authentication. If the provider changes the address unexpectedly, the saved value can stop matching the PBX’s traffic. Discuss an appropriate connection method with your administrator rather than switching a working system’s authentication mode without preparation.
3. Prepare a controlled cutover
- Choose a quiet period and finish active calls before changing authentication.
- Keep access to the PBX and Portal available independently of the connection being moved.
- Retain the old network configuration if you need a recovery path.
- Review inbound network rules and any external SIP-server or SIP-URI number destinations that explicitly reference the old PBX address.
An authentication change does not automatically rewrite a PBX firewall, DNS record or separately configured number destination. There is no guarantee of a seamless handover between two public addresses.
4. Change the existing IP in the Portal
- On the intended SIP line, choose Change IP Auth IP from its available actions.
- Check the current address shown in the dialog. Confirm you selected the existing line and the change action, not a different line or an authentication-mode switch.
- Enter the verified new public address and save once.
- Wait for the success or error response. After success, let the page refresh and confirm the saved value.
- Complete the corresponding network cutover on your PBX as planned.
The current workflow saves the change directly and returns a result. Do not follow older instructions describing a separate customer proof-staging or polling process. If the save times out or the response is unclear, reload the line and inspect its state before submitting again.
5. Understand the error instead of bypassing it
| Message or condition | Next step |
|---|---|
| Invalid IP address | Recheck the actual eligible public source address. Private or otherwise disallowed addresses are not a substitute. |
| Another account already uses that IP | Ask Support to review the intended arrangement. Do not enter a random unused address. |
| Main account must stay password protected | Return to the eligible additional SIP line intended for the PBX. |
| Action unavailable | Check the identity type and your permissions. Do not change another identity just because its action is visible. |
6. Verify each affected call path
After the move, make a small authorized outgoing call to a number you control and check the resulting call report. Confirm two-way audio. IP-authenticated trunks may not use password-style registration, so an “unregistered” label in a PBX alone is not a complete test of authorization.
For incoming calls, open Services → Phone Numbers and inspect each affected number’s saved destination. A route to a SIP identity and a route to an external SIP server are different configurations. If a destination explicitly contains the old address, update that route only after confirming the intended new destination and its network requirements. Then test incoming calling from another phone.
7. Recover or ask for help with evidence
If the move fails, compare the saved IP with the PBX’s actual signaling source. Record the exact response, public call reference and time with timezone. If you restore the old network, restore its matching authorized address and any independently changed incoming routes; reverting only one side can leave the mismatch in place.
Give Support the affected SIP identity, the intended change and the error privately. Never include your API key, SIP password or full login session. Avoid simultaneous changes to transport, encryption and routing while diagnosing an address change.
Frequently asked questions
Should I enter my PBX’s 192.168.x.x address?
No. Use the eligible public source IP seen for its SIP traffic, verified with your network administrator.
Will changing IP authentication move my incoming numbers?
Not necessarily. Review their saved destinations separately, especially external SIP-server and SIP-URI routes.
Do I need to change my SIP password too?
An IP-address change is a different operation. Do not rotate credentials or switch authentication modes unless that is part of your planned migration.
Related guides
Instructions reviewed on 8 October 2026. Available controls and service options depend on your account. Use the current values shown in your Portal.