
This guide is for administrators of a directly managed Asterisk system using res_pjsip. It does not use the older chan_sip syntax. If FreePBX or another interface generates your configuration, use that interface instead of editing generated files; see our FreePBX guide. Check your installed Asterisk version and its matching documentation before applying configuration.
Before you begin
This walkthrough uses an IllyVoIP line with password authentication. In SIP Lines, obtain the SIP username, SIP password, server, destination port and transport for your connection. Do not use your Portal email or login password. If the existing line uses IP authentication, do not switch it without checking the devices that depend on it.
You need administrator access to the PBX, a private configuration backup and a working internal extension for testing. An IllyVoIP SIP line connects the PBX to IllyVoIP; an extension connects a staff phone to the PBX. They are not the same account.
Start with one test extension and a destination you control. Do not move the whole office to the new trunk immediately. If the PBX already carries calls, keep the existing route available until the test is complete.
1. Build the trunk as related objects
In PJSIP, a registration is only one part of a trunk. Give the objects recognizable names, such as illy-auth, illy-registration, illy-aor and illy-endpoint. The names link the objects; they are not credentials. The exact files depend on your existing includes and configuration management.
| Field | Value to use |
|---|---|
| auth | type=auth; auth_type=userpass; username and password from the IllyVoIP line |
| registration | outbound_auth points to auth; server_uri is the server SIP URI; client_uri identifies your SIP user at that server |
| aor | Static contact points to the IllyVoIP server SIP URI used for outgoing calls |
| endpoint | aors points to aor; outbound_auth points to auth; context names a restricted incoming dialplan |
| transport | Reference your correctly configured transport; do not invent a second listener on an occupied address/port |
| identify | Map only approved incoming SIP source addresses to this endpoint when using IP-based endpoint identification |
2. Link authentication in both places
Use the line’s SIP username and SIP password in the auth object. Reference it from both registration and the outbound endpoint. A registration can succeed while outgoing calls fail if only the registration references credentials. For the registration, the general URI shape is sip:SIP_USERNAME@SIP_SERVER for client_uri and sip:SIP_SERVER for server_uri, with the required port/transport for your connection. Replace the labels with your own values; they are not literal settings.
Keep the existing transport unless a change is actually required. Some transport changes need more than a normal configuration reload. Do not restart a working PBX solely because a new account object is wrong. Make a backup and use your deployment procedure for the installed release.
3. Keep incoming calls out of the outgoing context
Create a dedicated incoming context, for example from-illyvoip, that sends only expected called identifiers to a known extension, ring group or IVR. Do not include an unrestricted internal/outbound context there. With source-IP identification, obtain the current approved signaling sources first; a registrar hostname alone is not proof of every possible incoming source.
Before writing a DID match, inspect what the PBX receives for a controlled incoming call. It may use a registration contact identifier rather than the displayed phone number. Match the observed, intended identifier instead of adding a catch-all that can dial arbitrary external numbers.
4. Add a narrow outgoing test route
In the context available only to your test extension, match the specific destination you intend to call and send it through the configured endpoint. The dial target shape is PJSIP/NUMBER@illy-endpoint. NUMBER is the destination after your chosen normalization. Do not place that dialing action in a public incoming context. After a successful test, expand only to the destination patterns and extensions your business needs.
5. Inspect state before changing settings again
At the Asterisk CLI, read pjsip show registrations, pjsip show endpoints and pjsip show aors. Check whether your named objects exist and whether the expected AOR contact is present. A registered status does not test the outbound dialplan. A missing endpoint is a configuration/loading issue, not automatically a rejected password.
If you need SIP logging for one failing test, have an administrator collect a short private trace, then disable the logger. Traces can contain phone numbers and authentication material. Compare the outgoing destination and response with the Portal call record before changing global timers, NAT or codecs.
Worked example: restrict the incoming and outgoing dialplan
The trunk objects above establish how Asterisk talks to IllyVoIP. The dialplan decides what an incoming call or a staff extension may do next. Use the following example only on a directly managed Asterisk installation. If a GUI generates your configuration, use that system's supported interface instead.
Before editing, record your active dialplan include files and save a private configuration backup. Choose one internal PJSIP endpoint and one outgoing destination you control. In the example, desk-test is the name of an existing internal endpoint, illy-endpoint is the configured provider endpoint, OBSERVED_INBOUND_ID is the literal called identifier seen on the intended incoming call, and AUTHORIZED_TEST_NUMBER is your permitted test destination. Replace all four where appropriate. Neither placeholder is a real telephone number or a value to guess.
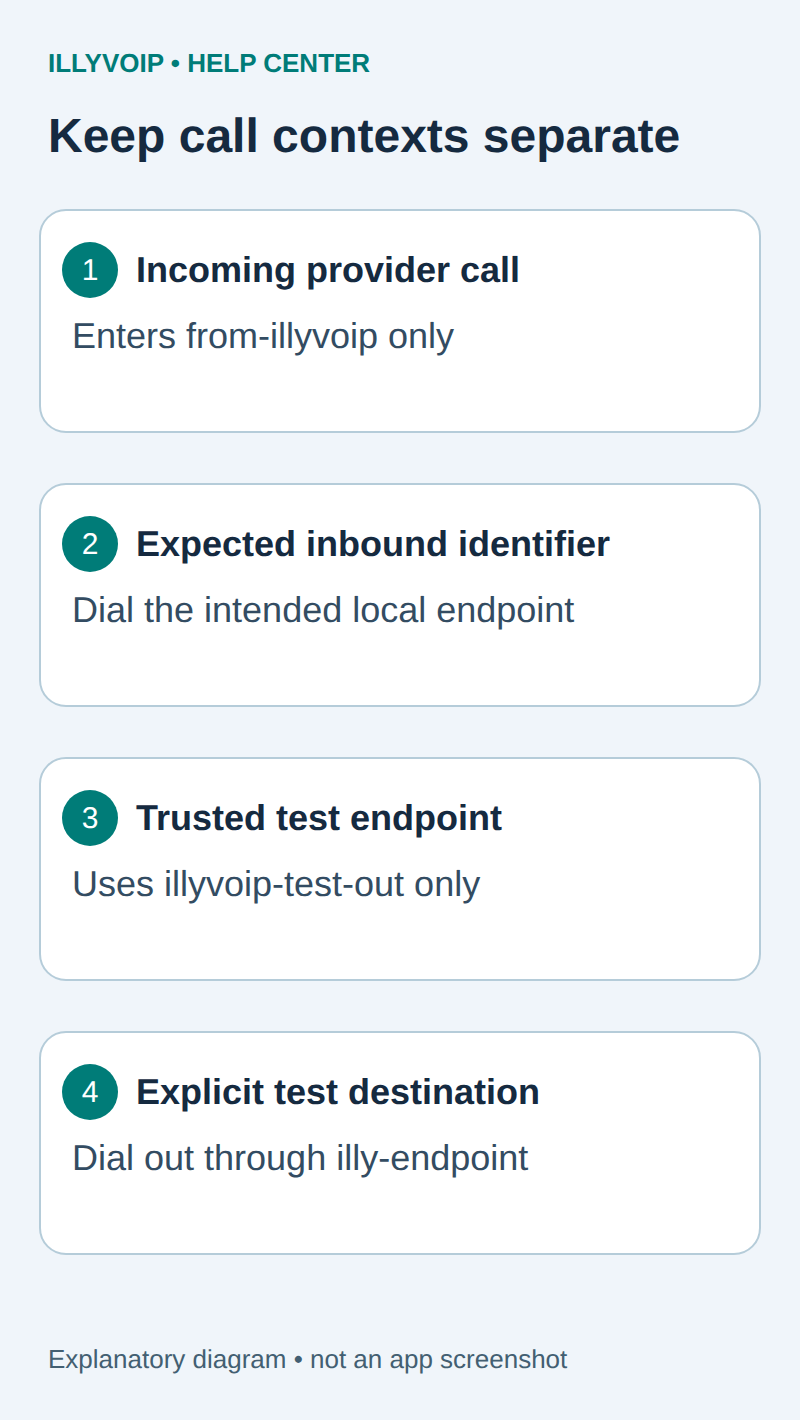
[from-illyvoip]
exten => OBSERVED_INBOUND_ID,1,NoOp(Expected IllyVoIP incoming call)
 same => n,Dial(PJSIP/desk-test,25)
 same => n,Hangup()

[illyvoip-test-out]
exten => AUTHORIZED_TEST_NUMBER,1,NoOp(Authorized IllyVoIP test destination)
 same => n,Dial(PJSIP/${EXTEN}@illy-endpoint,30)
 same => n,Hangup()
These are two separate contexts in your managed dialplan, commonly in extensions.conf or an already included custom file. Do not blindly append a second section with a name your installation already uses. Inspect and merge deliberately, preserving existing priorities and includes.
Configure the provider's PJSIP endpoint to use context=from-illyvoip. Configure only the intended internal test endpoint to use context=illyvoip-test-out, or deliberately include that outbound context in its existing restricted context. The context names alone do not assign permissions: the endpoint assignments and include graph must be checked too. Changing the internal test endpoint's context can remove its access to existing internal or emergency routes, so use a dedicated test extension and do not migrate staff devices with this minimal example.
Never include the outgoing context in from-illyvoip. Do not replace the literal incoming identifier with an unrestricted wildcard that forwards arbitrary digits to the external trunk. Incoming public calls should reach only the destinations you intentionally expose. If the provider sends a registration contact identifier rather than your displayed DID, match the identifier actually received on that intended route.
Validate, reload and inspect the expected matches
Check the saved file for unresolved placeholders, duplicate priorities and misplaced includes before loading it. Using your normal authorized Asterisk CLI access, inspect these contexts after the controlled reload:
dialplan reload
dialplan show from-illyvoip
dialplan show illyvoip-test-out
pjsip show endpoint illy-endpoint
pjsip show endpoint desk-test
dialplan reload changes the active dialplan; it is not merely a syntax check. Use your maintenance procedure, read the reload output and inspect both resulting contexts. Verify the endpoint context assignments separately. PJSIP object changes use their own supported reload procedure; a dialplan reload does not make every PJSIP or transport edit active.
Confirm that the selected literal incoming identifier reaches only the internal endpoint, that the selected outgoing number reaches only the provider endpoint, and that an unrelated number is absent from the test outbound context. Inspect included contexts as well: a match inherited through an include can broaden access even when the visible example is narrow.
The 25- and 30-second values are the example's Dial timeouts, not guaranteed ringing durations or billing rules. The destination may answer, reject, cancel or time out sooner. The example then hangs up; it does not add a hidden retry or alternate paid route.
Run the two call tests and retain a rollback path
- From the dedicated test extension, dial the exact permitted number after checking rates and caller ID. Verify trunk selection, answer and two-way speech.
- Call the intended active IllyVoIP number from another telephone. Confirm its saved Portal destination, the received identifier and that
desk-testrings. - Inspect an unrelated dial string with the CLI and verify it cannot reach an external route through these restricted contexts. Do not use a chargeable unauthorized call as your negative test.
- Record time, timezone, extension, selected route and public call reference. Expand destination permissions only after the narrow example works.
If loading fails or behavior changes unexpectedly, restore only the reviewed pre-change dialplan and endpoint assignments, reload using the appropriate procedure, and inspect the restored contexts. Preserve other administrators' concurrent edits. Do not restart the whole PBX to hide a routing mistake.
Official detail: contexts and priorities, pattern matching, and the Dial application. Worked example reviewed October 11, 2026; it is not a record of a customer call or a universal production dialplan.
Audio, caller ID and security
SIP transport and media encryption are separate settings. Match the Portal line’s audio mode to the PBX; Standard RTP, SDES-SRTP and DTLS-SRTP are not interchangeable. Avoid changing transport, codecs and network settings together, because you then lose track of which change fixed or broke the connection.
Use only an outgoing caller ID permitted by your account. Typing a number into the PBX does not verify it. Do not allow anonymous inbound traffic to reach public outbound routes, and do not disable your firewall. If source-IP restrictions are needed, obtain the current permitted addresses for your connection from Support rather than guessing an allowlist.
Acceptance checklist before staff use
- Check trunk registration separately from the test phone’s extension registration.
- Place a call from the chosen extension and confirm which trunk the PBX used. Check balance and rates first; this may be a chargeable test.
- Check two-way audio and the number presented to the recipient. Test keypad digits against a telephone menu you are authorized to use.
- For incoming calls, route an active IllyVoIP number to the PBX SIP line, call it externally and verify the destination inside the PBX.
- Confirm an extension without permission cannot use the test route. Expand staff access only after these checks.
Record the time, timezone, test extension, selected route and public call reference. If something fails, send these details and the PBX model/version to Support. The SIP response-code guide helps describe the failure. Do not post passwords or unredacted logs in public forums.
This guide is based on official documentation and the Portal workflow, not a claim that every PBX version has been tested through a real call. Emergency services and specialist equipment require separate configuration and verification.