How to set up MagnusBilling with ILLYVOIP
Written by Rexhep Arifaj | February 5, 2025MagnusBilling is a powerful open-source VoIP billing system that allows you to manage SIP trunks, VoIP providers, DIDs, and call routing efficiently. It is widely used by VoIP businesses, call centers, and service providers to automate billing, monitor call usage, and optimize traffic routes.
Key Features of MagnusBilling
- Manage VoIP accounts for users and clients.
- Create and configure SIP trunks to connect with providers like ILLYVOIP.
- Set up inbound and outbound routes to control how calls are handled.
- Automate billing and balance deductions based on call duration and rates.
- Monitor live call logs and reports to track call activity and usage.
- Become a VoIP reseller by offering ILLYVOIP services to your customers while managing everything from MagnusBilling.
By integrating MagnusBilling with Illyvoip, you can resell VoIP services, manage multiple clients, set pricing, and scale your business without worrying about infrastructure.
Step 1: Logging into MagnusBilling
First, log in to your MagnusBilling admin panel.
- Open your web browser and enter the MagnusBilling URL.
- Use the default login credentials:
- Username:
root - Password:
magnus
- Username:
Step 2: Creating a New User
After logging in, the first step is to create a user. This user will be assigned a VoIP plan and linked to your Illyvoip SIP trunk for making and receiving calls.
- Navigate to the Clients tab.
- Click on Users, then select New.
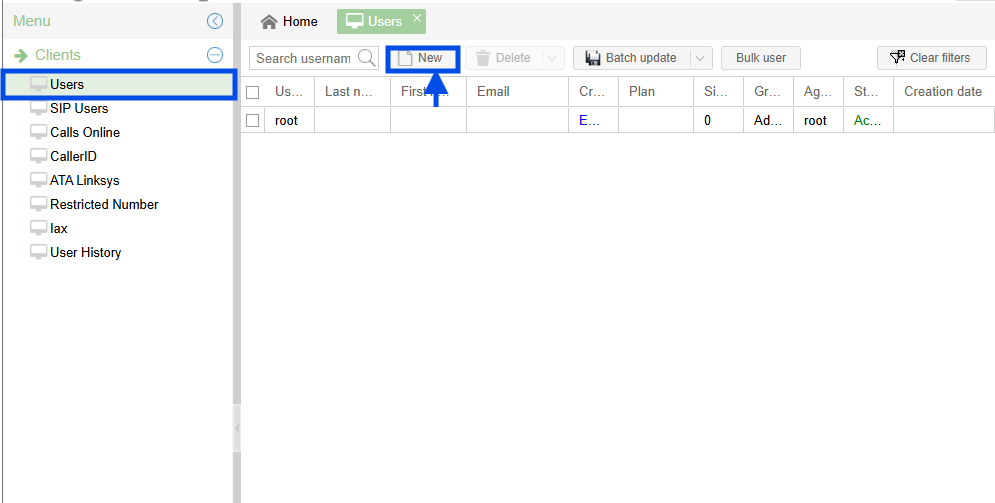
Now, you need to assign the user group (admin, agent, client). Since we are setting up a client, select the Client option to proceed.
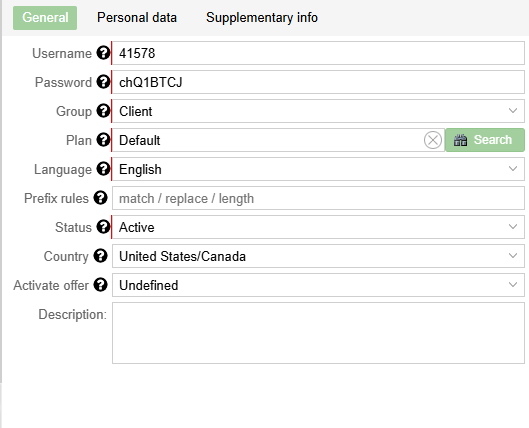
For now, we will use the default plan provided by MagnusBilling. A custom rate plan can be created later, but for now, we will assign the system-generated default plan to continue with the setup.
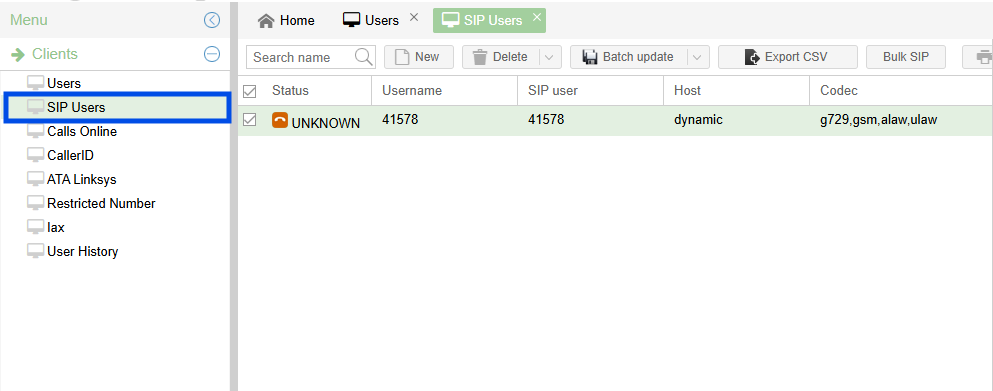
Testing the SIP Account
After successfully creating a user, MagnusBilling will automatically generate a SIP account for them.
Now, to test the connection, we will use Zoiper as our softphone application. However, you can choose any SIP-compatible software of your preference.
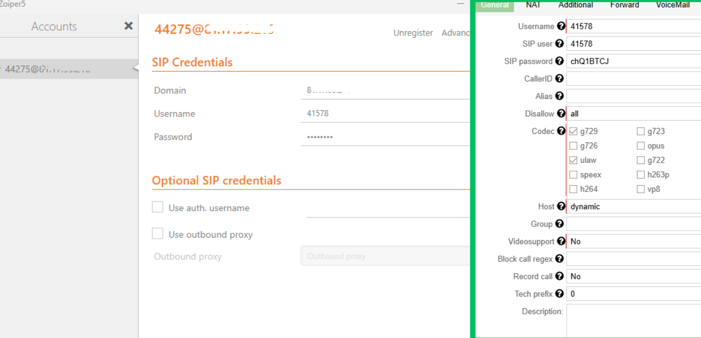
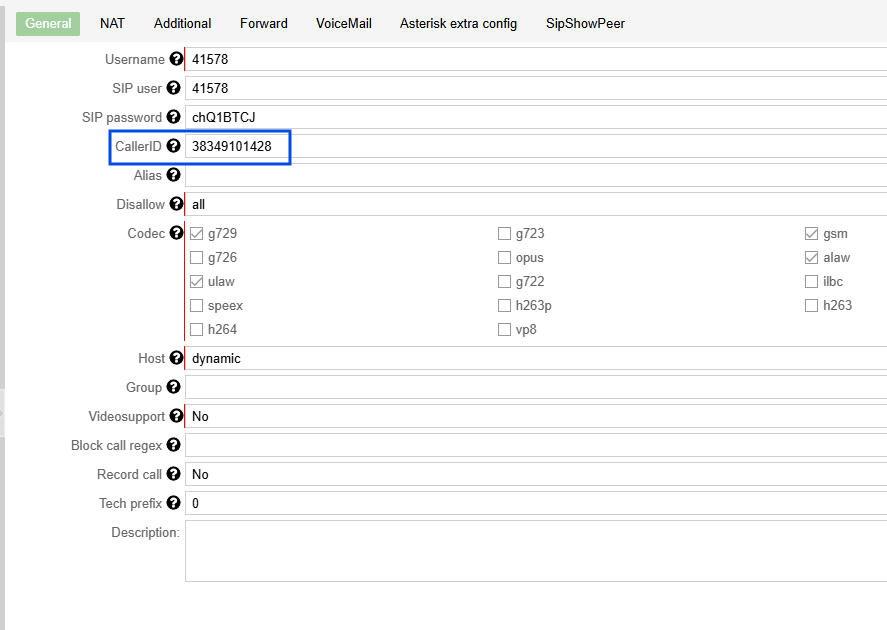
Enter your SIP Username in the following format:
- Domain:
8.8.8.8 - Username:
41578 - Password: chQ1BTCJ
Once all details are entered, click Register.
If the setup is successful, the SIP user status will change to OK, indicating a successful connection.
For a detailed guide on configuring Zoiper with your SIP account, refer to this article: How to Set Up Zoiper with a SIP User.
After successfully configuring the SIP user on Zoiper, the next step is to test the connection by making a call. However, before doing that, we need to create a provider.
To do this, navigate to the Routes tab, select Providers, and click New.
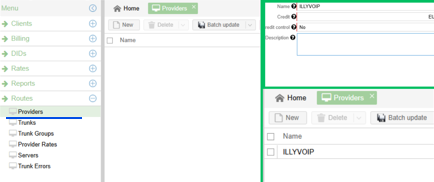
Fill in the Required Fields:
- Name: Enter a name for the provider (e.g., Illyvoip).
- Credit: You can set your current balance on Illyvoip to track your provider’s available funds.
- Credit Control: This allows you to monitor balance—see how much you have spent and how much balance is left with your provider.
- Description: Add any relevant details about the provider.
Click Save to confirm the changes.
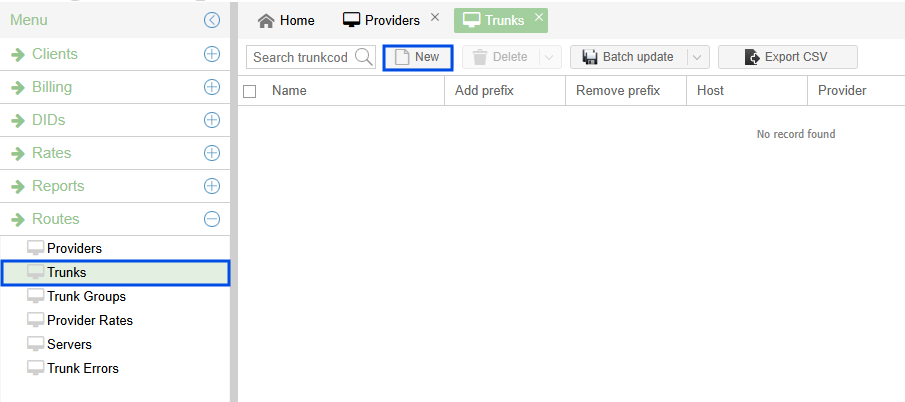
Adding a SIP Trunk
Navigate to the Routes tab and select Trunks. Click New to add a new SIP trunk and set up your ILLYVOIP account on MagnusBilling. This step is essential for routing outbound and inbound calls through your VoIP provider.
Get Your SIP Account Details
If you already have a VoIP account with ILLYVOIP, follow these steps to get your SIP account details:
- Log in to your Illyvoip account.
- Navigate to the SIP Accounts section.
- Find your SIP Username, SIP Password, and SIP Domain.
- Use these credentials to configure Magnus Trunk.
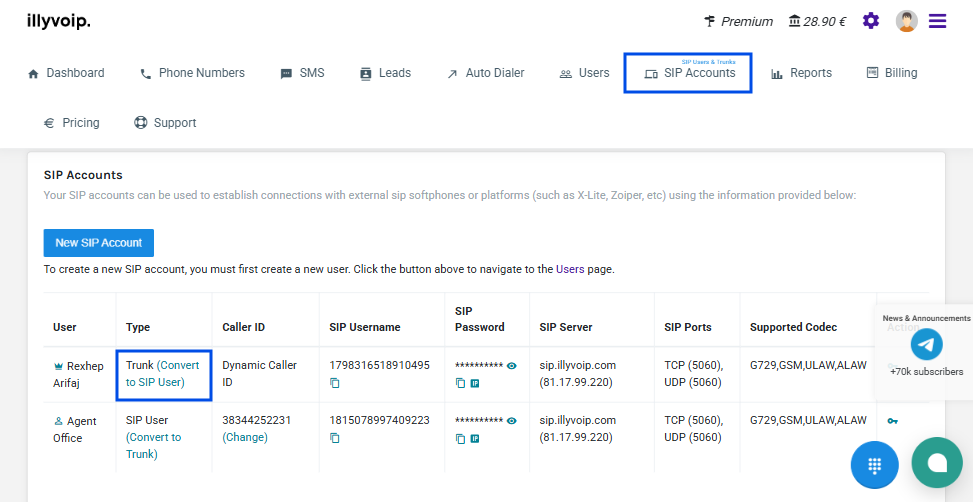
Tip: You can also convert a SIP User to a SIP Trunk by clicking "Convert to Trunk" in the SIP Accounts section.
Difference Between SIP User and SIP Trunk
- SIP User: A single account typically used for softphones or IP phones, ideal for one device or user registration.
- SIP Trunk: A connection that allows multiple concurrent calls, mainly used for PBX systems and business-level VoIP setups. It enables better call management, routing, and scalability.
If you need a trunk connection for multiple call channels, converting your SIP User to a SIP Trunk is recommended.

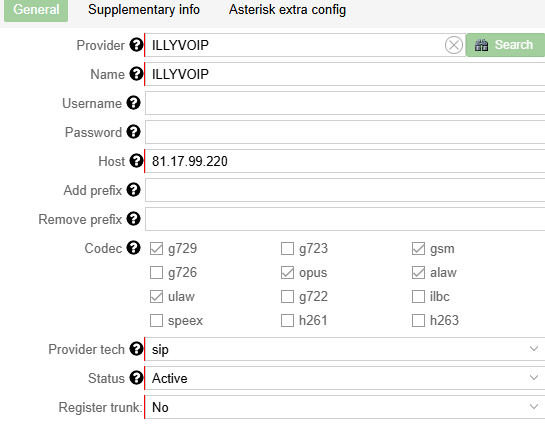
Configuring Your SIP Trunk
Fill in the details using your SIP account credentials from ILLYVOIP:
- Provider: Select the provider we created earlier (e.g., ILLYVOIP).
- Name: Choose a name for your trunk (e.g., ILLYVOIP).
- Username: Enter your SIP username from Illyvoip.
- Password: Enter your SIP password from Illyvoip.
- Host/IP: Use the provider’s SIP server IP or domain (e.g.,
81.17.99.220). - Prefix (Optional): If you want to use a specific routing, enter the corresponding prefix (e.g.,
40001for Platinum routes).
Note: In the Supplementary Info section, ensure that the From User field is empty. If filled, it will override the Caller ID.

Using IP-to-IP Authentication
You can configure a SIP trunk using IP-to-IP (IP Authentication) easily by following these steps:
- Go to your SIP Account on Illyvoip.
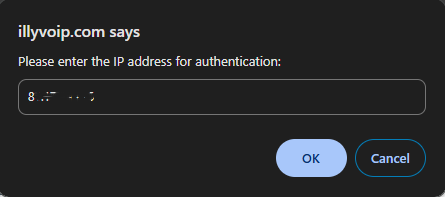
- Click the small IP icon located under the password field.
- Enter your server IP address.
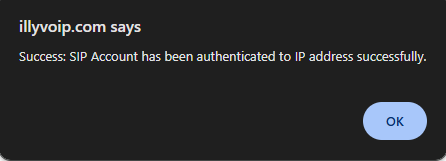
- On MagnusBilling, fill in only the Host(SIP Server) .
With this setup, you can now use ILLYVOIP with IP authentication.
If everything is configured correctly, you should see your ILLYVOIP trunk Active status
Now that the trunk is successfully configured, the next step is to create Trunk Groups. Navigate to the Routes tab, select Trunk Groups, and click New to set up a new group.
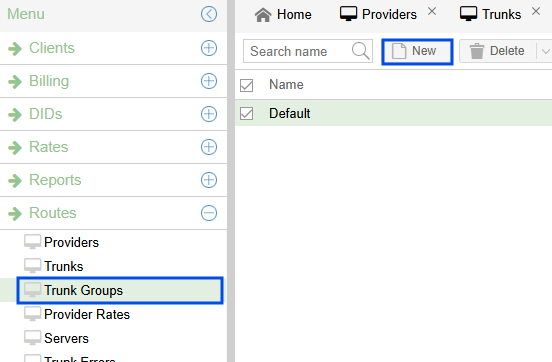
Configuring Trunk Group
Fill in the details to create a Trunk Group:
- Name: Choose a name for your group (e.g., ILLYVOIP-Premium).
- Type: Select Order to define how calls are routed through trunks.
- Trunks: Select the previously created trunk (e.g., ILLYVOIP).
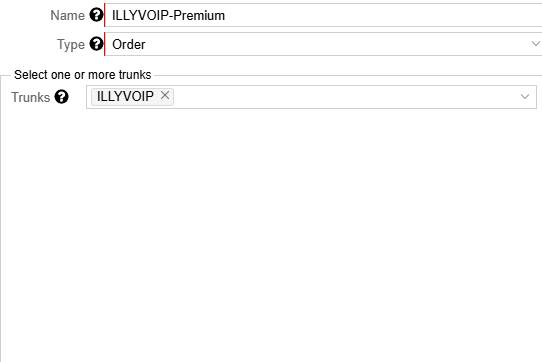
Once done, click Save to finalize the trunk group setup.
Creating a New Plan
After completing the trunk and trunk group setup, the next step is to create a new plan.
- Navigate to the Plans section under the Rates tab.
- Click on New to add a new plan.
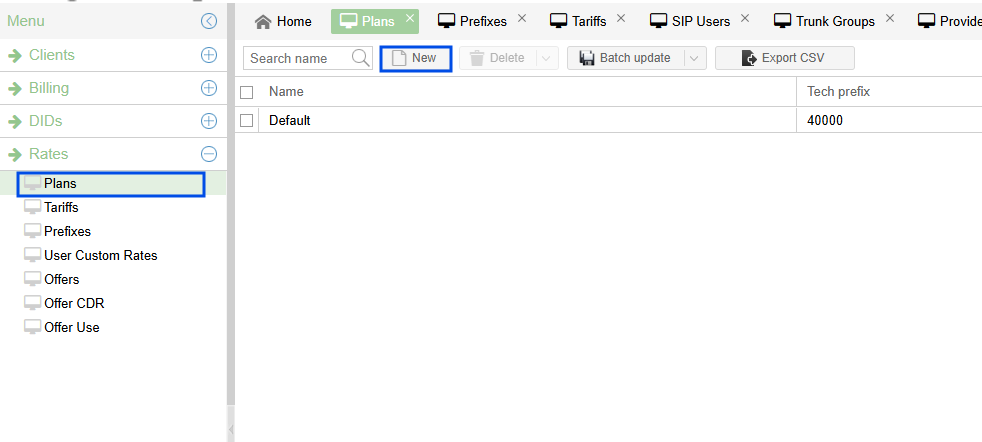
- Enter a name for the plan, such as ILLYVOIP-Premium.
- Configure other settings as needed:
- Use on signup: Choose whether new users can select this plan upon registration.
- Notices with audio: Set to Yes if you want users to hear notifications.
- Tech Prefix: Assign a specific prefix for routing purposes.
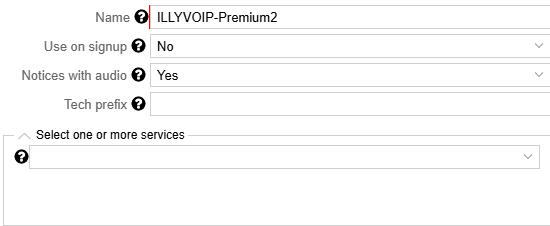
Click Save, and the new plan will be added successfully.
Configuring Prefixes
After creating the plan, the next step is to configure prefixes.
- Navigate to the Rates tab.
- Select Prefixes and click New to add a prefix.
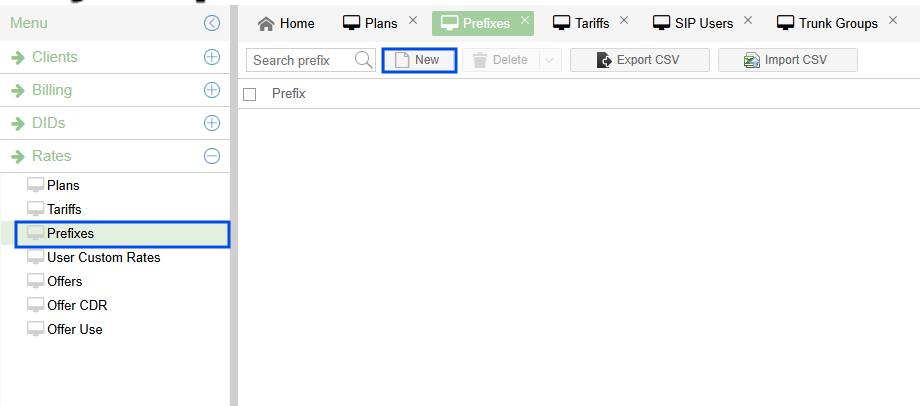
MagnusBilling provides the option to bulk upload prefixes and tariffs using a CSV file.
You can easily navigate to the Illyvoip Rates section, download the rate list, organize the data, and upload it directly into Magnus. However, for this guide, we will walk through the process of manually adding prefixes and tariffs step by step.

After adding the prefix, click Save to finalize the configuration.
Configuring Tariffs
Next, navigate to the Tariffs section under the Rates tab and click New to define pricing and other details for the selected prefix destinations.
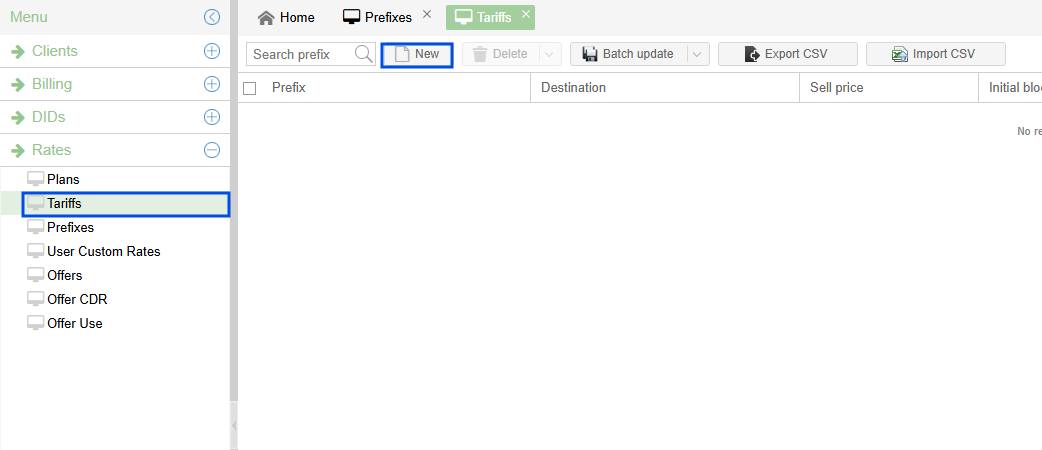
Configuring Tariffs for Prefix Destinations
- Plan: Select the plan you created earlier (e.g., ILLYVOIP).
- Destination: Choose the prefix you configured (e.g., Kosovo for prefix 383).
- Trunk Groups: Assign the trunk group we set up (e.g., ILLYVOIP-Premium).
- Sell Price: Define the price per minute for calls to this destination (e.g., $1 per minute for Kosovo).
- Initial Block / Billing Block: Set according to Illyvoip rates (e.g., 1/1 for per-second billing).
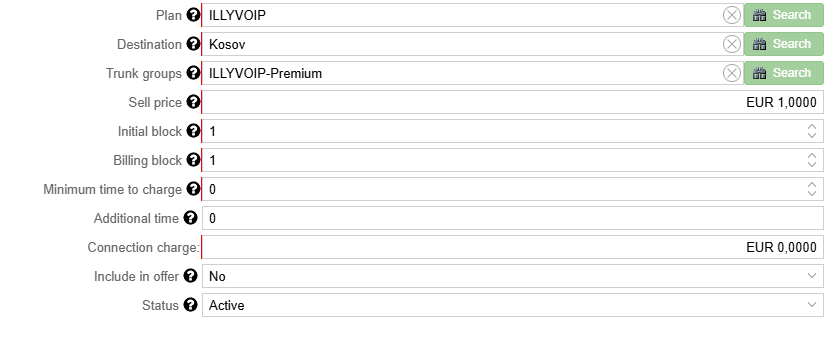
This setup ensures that calls routed through MagnusBilling are billed correctly based on the prefix and trunk configuration.Once you’ve configured the tariff, click Save to apply the settings.
Finalizing the Setup and Making a Test Call
To ensure everything is working correctly, we need to:
- Update the routing plan for the user we created. This ensures calls are routed based on the configured tariffs and trunks.
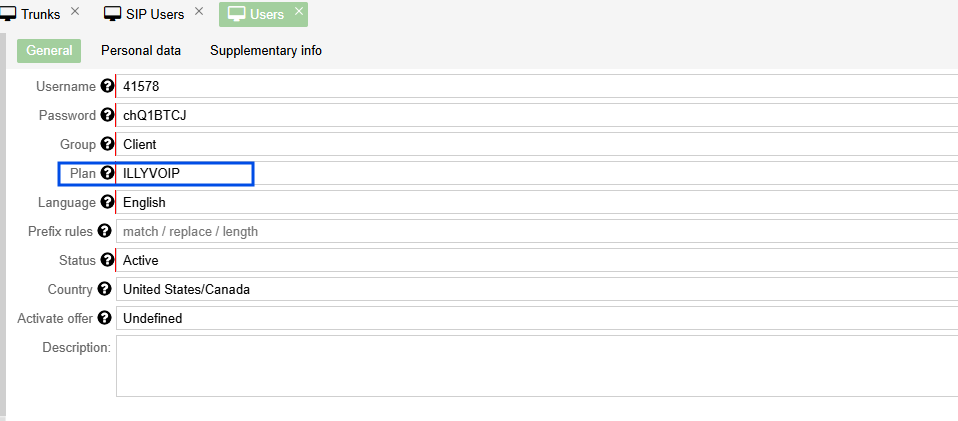
- Assign a Caller ID to the SIP user. This is necessary for making outbound calls and ensuring proper identification.
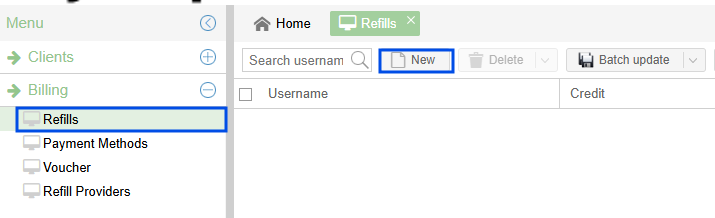
Ensuring the User Has Credit
To enable calling, the user must have sufficient credit in their account. Without credit, calls will be dropped with a "Balance Empty" message. Follow these steps to add credit:
- Navigate to the Billing section.
- Click on Refills and then select New.
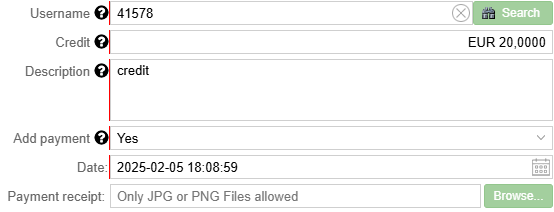
Assigning Credit to a User
Once on the refill page:
- Username: Select the user who needs credit.
- Credit: Enter the amount of credit to be added.
- Description: Provide a short note about the transaction.
- Add Payment: Choose "Yes" if you want to mark it as a paid transaction.
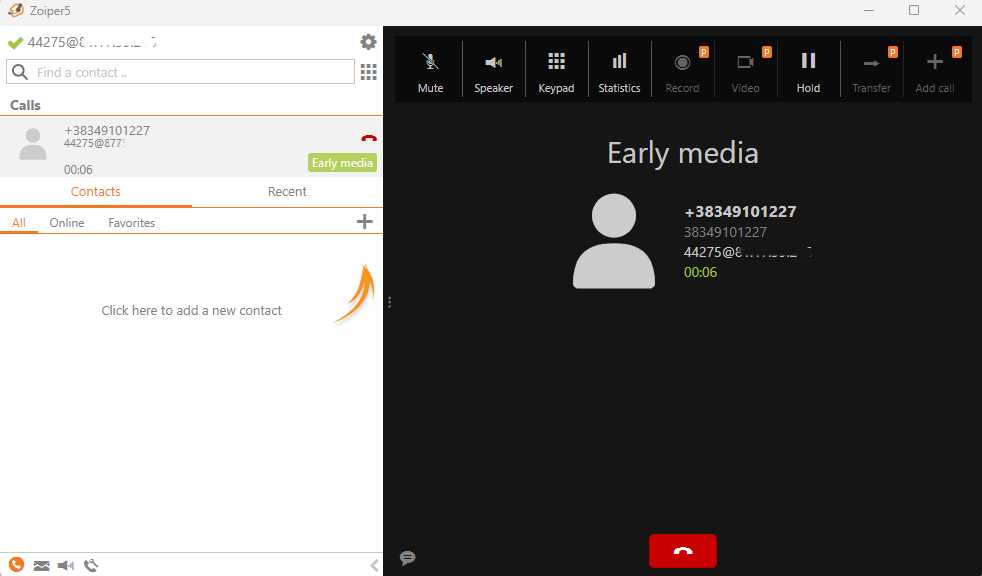
Making a Test Call
With these final adjustments, your MagnusBilling setup is ready for testing.
Now, let's place a test call to verify the configuration!
If everything is set up correctly, your test call should go through without issues!
Configuring DID Numbers on MagnusBilling
Step-by-Step Guide to Setting Up DID Numbers from Illyvoip
In this guide, we’ll walk you through the process of configuring your DID numbers from ILLYVOIP on your MagnusBilling server.
If you don't have a DID number?
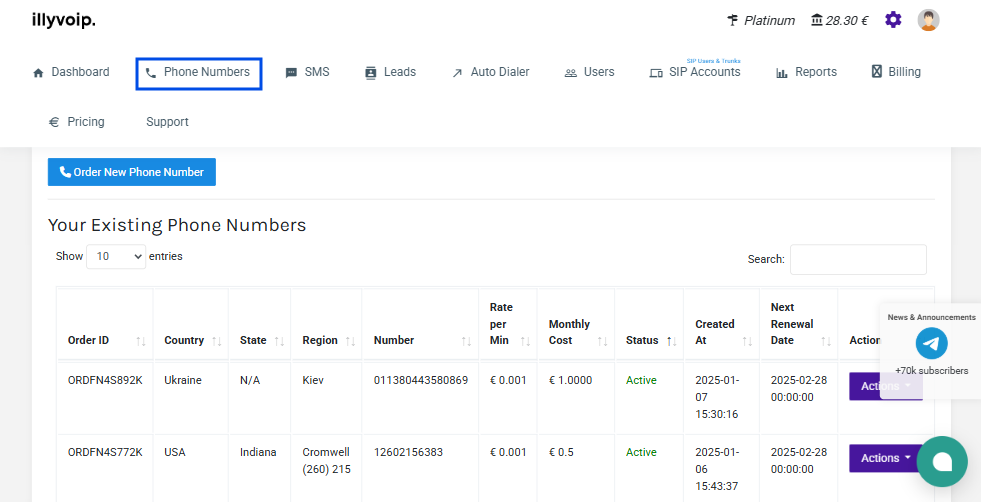
You can navigate to the Phone Numbers section on Illyvoip and place an order for a DID number.
Assigning Your DID Number
Once your DID number is active in ILLYVOIP, follow these steps:
- Go to the Phone Numbers section in your Illyvoip account.
- Choose the DID number you want to configure.
- Click on Actions Configure.
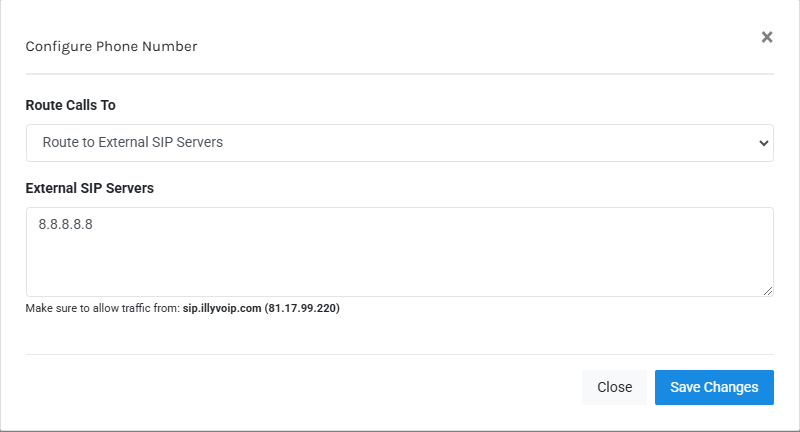
- Select Route to External SIP Extensions to direct inbound calls to your MagnusBilling setup.
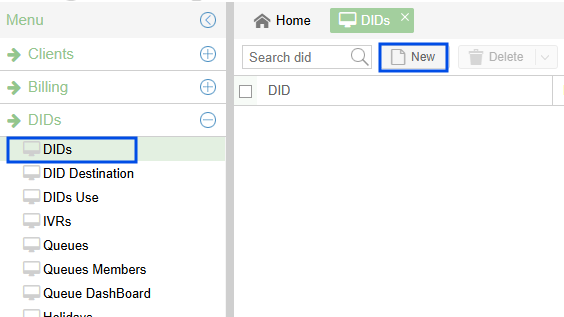
Configuring the DID inside MagnusBilling
- Navigate to the DIDs section in MagnusBilling.
- Click on New to create a new DID entry.
Now that we have added a new DID, it's time to configure it properly.
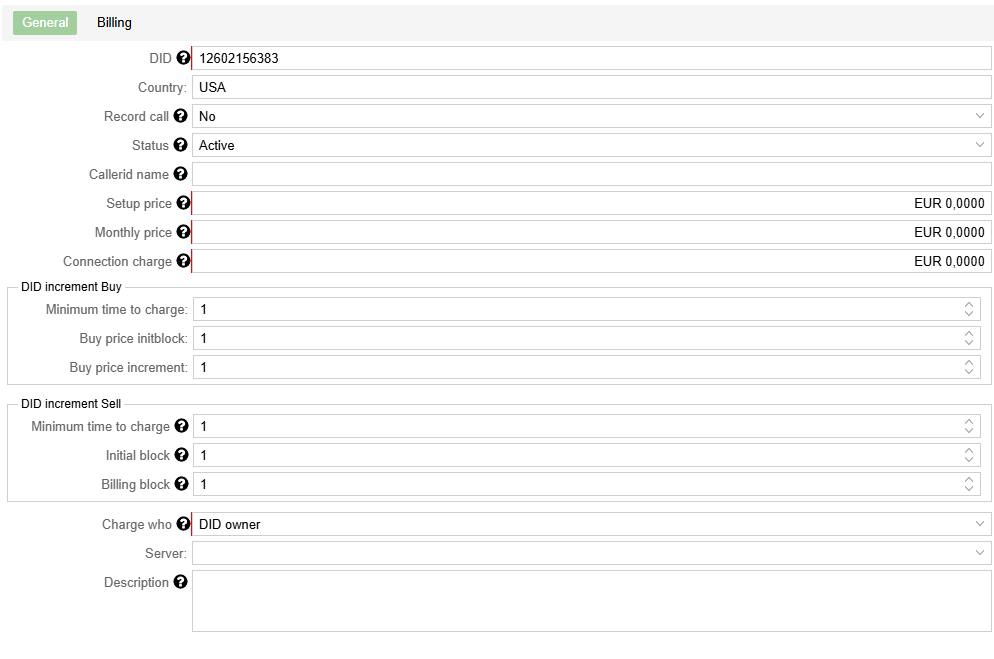
I have configured only the DID number, Country, and set the Status to Active to ensure the number is recognized in MagnusBilling.
Highly Recommended: Fill out the billing details, such as Setup Price, Monthly Price, and Connection Charge, to properly manage costs. Additionally, configuring the Caller ID, DID increment settings, and assigning the correct server will ensure smooth call routing and accurate billing.
Once all details are completed, click Save to finalize the configuration.
If the setup is successful, the Number status will change to Active, indicating a successful connection.
Now that the DID has been successfully added, the next step is to configure its **destination**. This will determine **where incoming calls to the DID will be routed**.
Configuring DID Destination
- Assigning the DID to a User
Follow these steps to configure your DID number:
- Select the DID number you created from the list.
- Enter the Username of the user who will receive calls from this DID.
- Ensure the Status is set to Active.
- Set Priority to 1 (or adjust based on your preference).
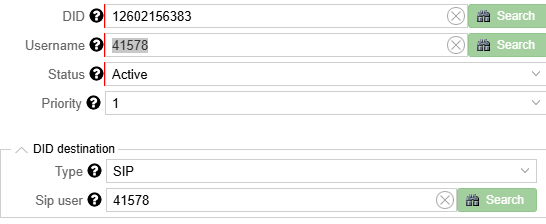
Click Yes to save the configuration.
Once the setup is complete, you should be able to receive calls on your SIP account configured in Zoiper.
Testing Your DID Number
To verify the setup, make a test call to your DID number using my mobile SIM card from local provider.
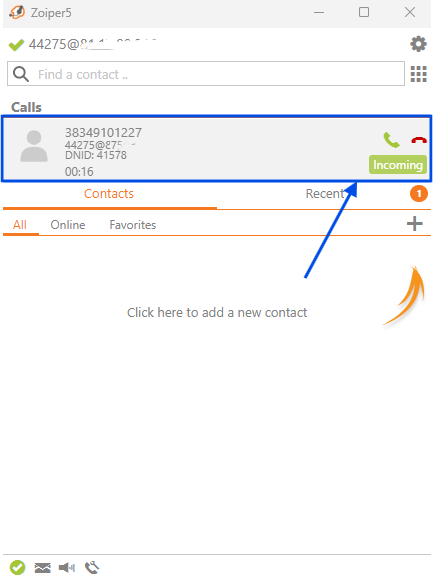
The calls are successfully coming through my SIP extensions on Zoiper 5. If you have any trouble or issues, feel free to contact our support for further assistance.
For more about SIP trunking or softphone configuring, check this article.
We’re Here for You
Experience unparalleled support with our dedicated team of experts. Whether it’s day or night, our knowledgeable and responsive support heroes are ready to assist you whenever you need help.