
To request an SMS Sender ID in IllyVoIP, open SMS → Messages, open Manage SMS and choose Sender IDs. Select New request, enter your authorized sender name and submit it for review. You can attach supporting documents immediately or respond later if the review asks for more information. Use the name for sending only when it is approved and available in the composer.
This guide covers the English web Portal and its Sender ID request workspace, checked on October 9, 2026. It explains the request and review process; for recipients, message text and sending, use the Portal SMS sending guide.
Before you request a sender name
An SMS Sender ID is the identity requested for a text message. It is separate from your voice Caller ID, login phone number and a purchased incoming number. The current branded-sender request form accepts 1–11 letters. Use A–Z letters for a business or service name you are entitled to use. Spaces, digits, punctuation and accented letters are not accepted by this form.
You may see the wider industry term “alphanumeric sender ID,” but that does not mean the IllyVoIP form accepts every alphanumeric combination. Follow the limits displayed in the Portal. For example, NORTHCLINIC fits the letter and length rules; it is an illustrative name, not a sender that has been reserved or approved for you.
- Sign in to the account that will use the sender and check that you have access to its SMS workspace.
- Have a short explanation of the sender’s relationship to your business and the messages you plan to send.
- If available, prepare relevant evidence of that relationship. Follow any specific document request you receive; there is no universal document list that guarantees approval.
- Check whether the intended destinations have additional sender requirements. Approval in the Portal does not guarantee that every receiving network will display the requested name.
1. Open the Sender ID request workspace
- Open SMS → Messages in the Portal.
- Open Manage SMS beside Send SMS and select Sender IDs. The Sender IDs link in the composer also opens this workspace.
- Review the existing requests before creating another one. The list shows the requested name, its status and submission time.
- For an existing name, select View to read its current status and conversation. Use Older requests if that control is shown and the request is not on the first page.
Keep an existing review together. Submitting the same sender again does not replace its decision or bypass the review; open the existing request to see whether a response is needed.
2. Submit a new request
- Select the Sender IDs tab, then New request.
- Enter the name in Sender ID. Check the spelling and the 1–11-letter limit.
- Use Explanation (optional) to explain who uses the name and why. For example: “This is our clinic’s trading name. We will use it for appointment reminders to patients who have agreed to receive them.” Use your own accurate explanation.
- If useful, attach files under Supporting documents (optional).
- Check the name, explanation and selected files, then select Submit request.
- Open the saved request and read the status actually shown. A successful submission means the request was saved; it does not by itself establish approval.
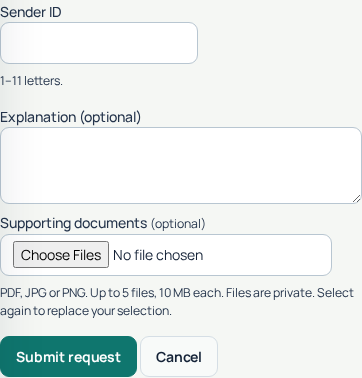
The explanation field allows up to 4,000 characters. Keep it clear and specific rather than filling the space. Do not include passwords, API keys or unrelated customer records.
3. Attach the right supporting documents
The request form accepts PDF, JPG and PNG, with up to five files and 10 MB per file. The files are private attachments to the review, not public Help Center uploads. Include only material relevant to the sender request, and avoid unnecessary personal information.
A reviewer might need evidence connecting the business and requested name, such as a relevant business-registration document or authorization to use a brand. These are examples of possible evidence, not a promise that a particular document is required or sufficient. Read the actual request before uploading.
The file picker replaces its selection when you choose files again. Select all the files you intend to include together, then check the displayed selection before submitting. If a file is rejected, check its type and size; changing a filename extension does not convert the file.
4. Read the status and reviewer’s note
Open View beside the sender. Read both the status and the visible note: the status tells you where the request stands, while the note explains the action needed for that request.
- Pending review: the request is awaiting a decision. Do not treat it as an approved sender.
- Information required: the reviewer needs an answer or documents. Read the note and use the response form in the same request.
- Approved: the sender request has been approved. Return to the composer and verify that you can select the name.
- Declined: read the reason. If you have relevant additional information, use the reconsideration form shown in the request.
- Revoked: the previous approval is no longer valid. Read the note and use the available reconsideration form if you can supply relevant information; do not assume an earlier approval still authorizes sending.
The detail page includes the available conversation and attached documents. Use Older messages and Latest messages when displayed. Some older requests may say their earlier conversation history is unavailable; that does not erase the current status or create a new approval.
5. Respond to an information request or ask for reconsideration
- Open the existing sender request and read the most recent note.
- For Information required, write in Your response. For a declined or revoked request, use Additional information for reconsideration.
- Answer the specific questions and attach supporting files if needed. You must provide a reply or at least one document; an empty response cannot be submitted.
- Select Submit response once, then check the updated request and conversation.
A saved response returns the request to Pending review. It does not approve or restore the sender automatically. While the request is pending, wait for the next decision rather than opening duplicate requests. If the Portal says the review changed, refresh it, read the latest note and decide whether your response is still appropriate before trying again.
6. Select the approved sender before sending
- After the status shows Approved, return to SMS → Messages and reopen Send SMS.
- Find the approved name in the Sender ID selection. Check that you are in the same account as the request.
- Prepare a small, authorized test to a recipient you control. Review the message, destination, segments and quoted cost before confirming. Normal SMS charges apply.
- Check the message record and, where available, the recipient’s actual display. A submitted message, a delivery report and the name shown on a receiving handset are different checks.
If an approved name is absent, refresh or reopen the composer and recheck the request’s current status. If it is still missing, contact Support with the sender name and relevant request details. Do not repeatedly resubmit the sender or send paid tests hoping to change its approval state.
If something does not work
- The name is rejected: remove spaces, digits, punctuation or non-A–Z letters, and check the length. If the name is already in use or has an existing request, read that request or ask Support about the specific message.
- A document will not upload: check the five-file limit, each file’s size and its actual PDF/JPG/PNG format. Reopen the review if its state changed while you were preparing the upload.
- There is no response button: the response form is shown for Information required, Declined and Revoked. Refresh and read the current state; a Pending review or Approved request is not waiting for that response.
- The review remains pending: use the saved request and current Support options if you need clarification. This guide does not promise a fixed approval time.
- The name is approved but sending is blocked: check the exact sending error. Sender approval does not remove account restrictions, daily SMS limits, insufficient balance or a separate Communication review.
- The recipient sees a different sender: collect the destination, time and message reference, then ask Support to check the route and destination requirements. Approval alone does not prove sender preservation on a particular network.
Common questions
Do I have to attach documents with the first request?
No. The initial supporting-document field is optional. The review may later ask for specific evidence; supply it through the same request rather than creating a replacement.
Does a Sender ID request register my brand in every country?
No. It is an IllyVoIP sender request. Destination-specific registration, account eligibility and network handling can still apply. Confirm requirements for the destinations you intend to use before a campaign.
Can I use this form to verify a voice Caller ID?
No. This workspace is for SMS sender names. Voice Caller ID and incoming-number setup are separate workflows.
Does replying to a declined request make it approved?
No. A valid reply reopens the review as pending. Wait for a new decision and verify the sender’s availability before using it.