
Telephone is a macOS SIP calling app from 64 Characters. It can use an IllyVoIP SIP line without a desk phone. This guide covers adding the account and checking ordinary voice calls; it is not the macOS feature that relays calls through an iPhone.
Use the official Telephone distribution compatible with your Mac. You need a microphone or headset, an authorized IllyVoIP SIP identity and permission to configure the app. The developer's FAQ includes instructions for several generations of macOS, so follow the current operating system's labels where older screenshots differ.
1. Prepare the SIP identity
In IllyVoIP, open Services → SIP Lines. Select the line for this Mac and confirm that it uses password authentication. Obtain its SIP username and password through the authorized account controls, then expand Technical endpoints for the regional hostname, port and transport.
Check the line's audio mode and permitted caller ID. The Portal login email and password are not the SIP account. If the identity is already in use on another device, decide which client should own it rather than assuming simultaneous independent registrations will ring together.
2. Add an account in Telephone
On first launch, use the account-creation dialog. If you already have accounts, open Telephone's settings/preferences and use the account list's add control. Enter the account data carefully:
| Telephone value | What to use |
|---|---|
| Full Name | A readable label for this account. It is not caller-ID authorization. |
| Domain | The IllyVoIP SIP domain/hostname supplied for your connection. |
| User Name | The selected SIP line's username. |
| Password | The SIP password belonging to that username. |
If your configuration exposes a separate authorization username or proxy setting, use only the value actually supplied for the service. An optional proxy is not a place to paste the Portal URL. Keep the host, port and transport consistent with your line; do not add a web path such as /voice.
Save the account and check its availability/registration indication. If the app reports an error, record it exactly before making another change. A saved account dialog does not prove successful registration.
3. Match the supported connection and audio mode
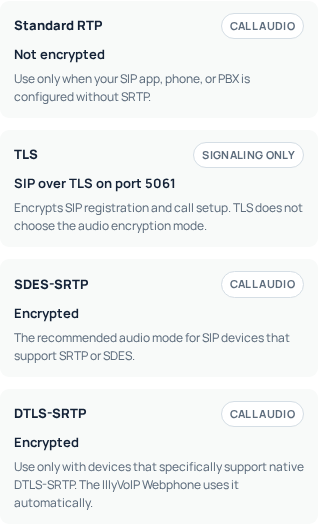
Review the account's available network settings against the Portal. Do not infer that every transport or SRTP variant offered by another softphone is present in your installed Telephone version. If you cannot select a compatible combination, have the exact app version and line policy checked rather than silently weakening the line's encryption.
For TLS, preserve hostname validation and use the SIP hostname from the Portal. Signaling security and audio encryption are separate. Keep optional NAT/proxy settings at their understood configuration; copying another provider's STUN server or port is not a general fix.
4. Give the Mac access to the right microphone
- When Telephone requests microphone access, allow it if you intend to use the app for calls.
- If access was denied, open macOS System Settings → Privacy & Security → Microphone and review Telephone's permission. Older macOS releases use different settings labels.
- Open Telephone's sound preferences and select the intended input and output devices.
- Check the headset's physical mute control and the Mac's input/output levels.
- If the app needs to restart after a permission change, finish any active call before restarting it.
Connecting a Bluetooth headset can change which device handles audio. Test the specific headset and reconnect behavior you plan to use. Contacts permission is a separate choice; you can begin by dialing a number manually.
5. Verify outgoing and incoming calls
Select the correct Telephone account and dial an authorized destination in international format. Check your balance and destination rate first; normal charges may apply. Confirm the caller ID and ask the other person to check your microphone while you check their audio.
For incoming calls, inspect the IllyVoIP number's saved destination. It must reach the SIP identity registered in Telephone, either directly or through the intended workflow. Call that number from another phone and answer on the Mac. A successful outgoing call alone does not validate this route.
Test again after the Mac has been idle in its normal working setup. A sleeping computer, a closed app or a changed network can affect availability. Do not rely on a foreground test as proof of unattended incoming service.
6. Use diagnostics without sharing credentials
Telephone documents Help → Show Log File in Finder for finding its log. Keep a private copy of the relevant period before restarting, since the developer notes that the log is overwritten when the app starts. Logs may contain telephone identities and signaling details; review them before sharing.
Include the Telephone and macOS versions, registration state, the exact symptom, timestamp/timezone and an IllyVoIP public call reference when available. Share sensitive details privately with Support, not in a public issue or screenshot.
Common problems
- Registration fails: check the SIP username/password, domain and connection settings; the Portal login is not a substitute.
- The remote party cannot hear you: check microphone permission, input selection and physical mute before resetting the account.
- The wrong account places the call: select the intended account explicitly and review your application's default-call behavior.
- The Mac does not ring: compare the incoming destination, app availability and computer sleep state.
This guide does not require Telephone Pro or promise a particular number of simultaneous calls. App features and account call limits are separate.
Related guides and references
- Move from X-Lite to Bria Solo with IllyVoIP
- Configure Linphone with an IllyVoIP SIP Account
- Set Up Groundwire with an IllyVoIP SIP Account
- www.64characters.com — official reference
- www.64characters.com — official reference
- github.com — official reference
Reviewed 9 October 2026 against current IllyVoIP source and the linked documentation. Use the settings available to your account and installed version. These instructions are not a claim of a completed physical-device or live-service test.