
Export the intended Outlook contacts to CSV, review a small copy, then use IllyVoIP’s Contacts import to map the fields. This is a deliberate import, not a live synchronisation: later Outlook changes do not automatically update the Portal.
1. Choose the right Outlook export
Identify whether you use new Outlook for Windows, classic Outlook or Outlook on the web. The export controls differ. Use the account and contacts folder that contain the records you are authorised to move; a company directory and your personal contacts are not automatically the same source.
- New Outlook for Windows: open People, choose Export contacts, select the intended folder in the export dropdown and export the CSV.
- Classic Outlook: use File → Open & Export → Import/Export → Export to a file → Comma Separated Values. Select the correct Contacts folder and choose a private output location before finishing.
- Outlook on the web: open People and use Manage contacts → Export contacts, selecting the intended contacts scope. If your interface differs, follow Microsoft’s current instructions for that edition rather than looking for the classic File menu.
2. Keep an original and prepare a small reviewed copy
Keep the original export unchanged in private storage. Use a copy for field cleanup. CSV may include more personal fields than the Portal needs; retain only the information appropriate for the intended account and purpose. Importing a contact does not create permission to send marketing messages or call someone.
Open the file with a tool that preserves telephone numbers as text and supports UTF-8. A spreadsheet can remove a leading plus or zero or display a long number in scientific notation. Review the saved CSV itself after editing rather than assuming the displayed cells prove the file is correct. Quotes around a CSV value alone do not guarantee a spreadsheet will preserve its text type.
3. Choose one intended phone field
Outlook can export separate business, home and mobile phone columns. Decide which is the contact number for this import. Do not concatenate several phone fields into one IllyVoIP number or pick the first nonempty field without a business rule. Prepare complete international numbers, and keep extensions separate until you know how the receiving workflow represents them.
Column labels may be localised in the Outlook export. Match their actual contents, not only an English header from a tutorial. Review names with accents, quoted commas and blank values. Start with a few fictional or authorised test contacts that cover these differences.
4. Open the IllyVoIP import preview
- Open Contact Center → Contacts and choose the CSV import action available to your account.
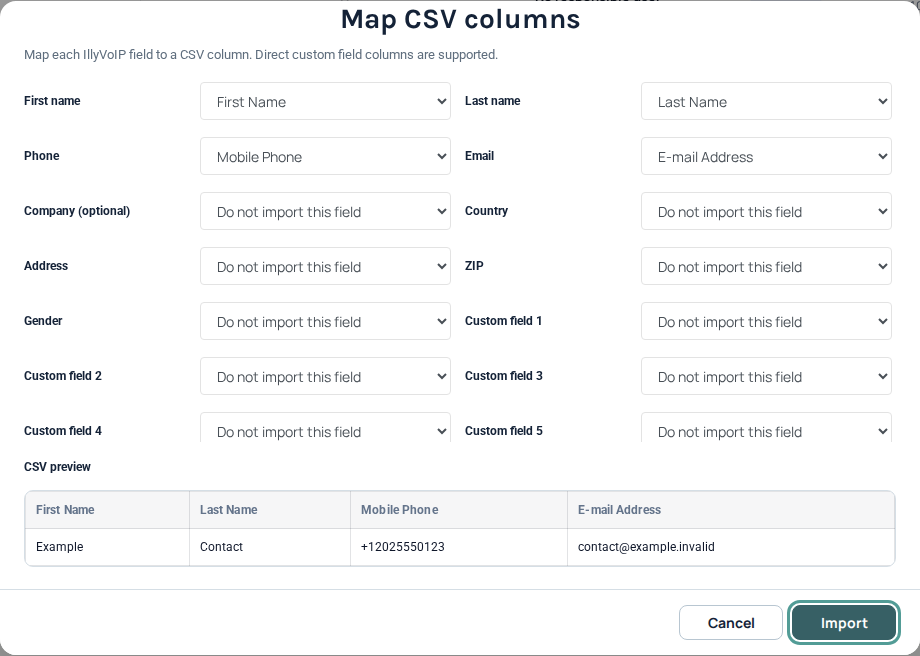
- Select your small reviewed CSV copy, contact group, delimiter and header-row setting, then choose Next: map fields. Inspect the preview before importing.
- Map the intended name, telephone and email columns to the Portal fields. Configure any required custom fields using the actual workspace schema.
- Review responsibility, company or sharing options where offered. Importing into the correct account does not mean every colleague should have access to every contact.
- Remove unintended duplicates from your prepared file before selecting Import. The current CSV path inserts records; it is not a merge/upsert by telephone number. Import only the reviewed file.
5. Reconcile the result before the full import
Compare the reported imported count with your test file. The admitted import is transactional: a row error rolls back that import instead of confirming a successful partial batch. Open representative contacts and check their name, full phone number, email, custom fields and visibility. A successful upload is not proof that every source row became the intended contact. Fix malformed numbers and mapping problems in the working copy before importing the larger set.
If the response is interrupted, inspect existing contacts and the import result before replaying the file. Do not assume importing it twice merges every record. Keep a record of which source file and rows were processed. If you need continuing synchronisation, design a stable external-identity integration instead of scheduling repeated blind CSV uploads.
Common problems
- Unreadable names: inspect the CSV encoding and choose UTF-8 without corrupting the original export.
- Missing or shortened numbers: check spreadsheet text conversion and which Outlook phone column you mapped.
- Unexpected duplicates: remember that CSV inserts records; review existing records before retrying.
- Wrong contact visibility: inspect responsibility/sharing choices and your account permissions.
- Missing Outlook records: confirm the exported account and folder; a local classic-Outlook contacts folder may not be present in another Outlook edition.
Related guides
- Organize your contacts
- Organize companies and contact fields
- Sync CRM contacts into IllyVoIP with the Contacts API
Reference
Current instructions and technical reference: Microsoft Outlook contact export.
Reviewed 12 October 2026 against the current IllyVoIP controls, implementation and applicable references. Available options depend on account permissions and service state.