
Check for an existing contact
Open Contact Center → Contacts and search before creating another record. Compare the phone number and company as well as the name.
The list shows the contact, phone, company, responsibility, status and creation date. Use the full profile or quick-profile action to check the record you intend to work with.
Enter the details your team needs
Select Create contact. The current form requires a first name and phone number. It also offers last name, email, company, group, location and custom fields.
Use a consistent phone format and only the details needed for your work. Check which company and group you are selecting before creating the record.
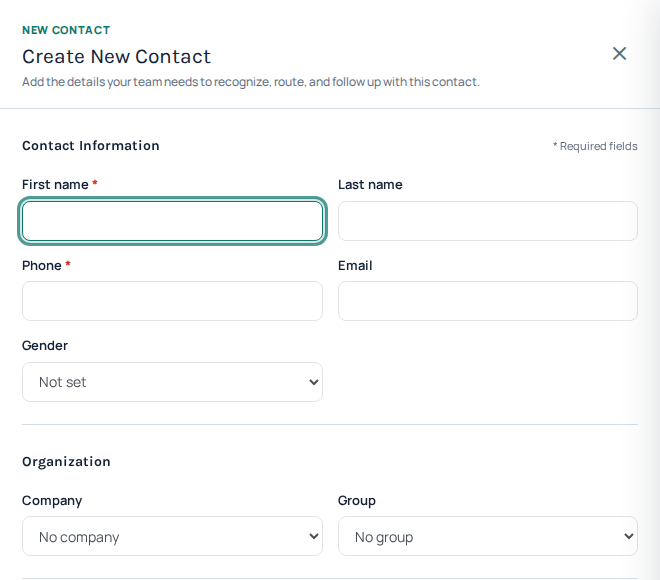
Create New Contact starts with contact details and organization. First name and phone are required. This blank form has not been submitted. Open the image for a larger view.
Set responsibility and sharing
Responsible user
Choose who should take responsibility for the contact.
Shared with
Select the people who need access to work with the record.
Group
Use a consistent grouping convention so the team can find related contacts.
Review these separately: assigning responsibility and sharing access serve different purposes. Use the options available to your account rather than assuming every teammate can see every contact.
Keep notes with the correct person
Open the contact in Agent Workspace when handling a conversation. Confirm the loaded person before saving a note, scheduling a follow-up or editing the profile.
Keep notes concise: the reason for the conversation, the outcome and the agreed next action. Avoid creating a second contact just to record another interaction.
Coordinate CRM changes
If HubSpot is connected, review contact-import and lead-export choices before editing matching records in both systems. Check the configured conflict-handling approach and any pending updates.
For a missing or conflicting record, collect its reference, the sync direction and the time. Share only the details needed to investigate it.
Import contacts from a CSV file
- Open Contacts and choose Import CSV. Prepare a small representative file first rather than importing your entire address book immediately.
- Review the delimiter and whether the first row contains column headings. Check the sample rows: each value should appear in the intended column.
- Map the columns to the contact fields. Check names and phone numbers particularly carefully; preserve international prefixes and leading digits.
- Review the available import options, submit once and inspect the result before repeating an import. Check rejected rows rather than assuming every row was accepted.
A CSV import does not establish permission to call or message the contacts. Import only information your organization is entitled to use.
Use bulk actions without changing the wrong contacts
Filter the list, select the intended contacts and check the selection count before changing their status or group, exporting CSV or deleting. Do not assume that selecting the visible page selects every result across all pages. Treat Delete selected and Delete all as different actions and read the confirmation scope.
Review duplicates before removing them
Use Remove duplicates and choose the matching fields carefully. Review the preview before confirming removal. Two people can share a company name or telephone number; a match is not always an unwanted duplicate. Export a copy of the relevant records before destructive cleanup, and keep exported personal information secure.
Choose a duplicate field that identifies the same person
The duplicate-removal workflow compares one offered field at a time: phone, email, address, postcode or country. Matching a field does not necessarily mean that two records represent the same customer. Country and shared office addresses are particularly broad matches; do not use them as a shortcut for cleaning a list.
For example, two contacts can legitimately share a reception phone number. Review their names, ownership and purpose before removing either record. Email matching ignores surrounding spaces and letter case. Phone matching is not a general international-number normalization service, so differently written numbers may need individual review.
Review the retained record before confirming removal
- Use the account owner's duplicate-review workflow in Contacts and choose the intended matching field.
- Read the preview, including the records proposed for removal and the retained record. The current comparison keeps the earliest record ID in each matching group; it does not automatically choose the richest profile.
- Compare useful details, responsibility and related work. Export the relevant contacts before a destructive cleanup if you need a reference copy.
- Check the scope of this duplicate preview itself. Do not assume the ordinary list's current page, search or selected rows limits duplicate matching: the review checks the owner's non-deleted contacts for that field.
- Confirm removal only if the entire proposed set is correct. If the preview is stale or a record has changed, run a fresh review and inspect it again.
- Search for the retained contacts after completion and check any affected campaign or follow-up work.
This action removes duplicates; it does not merge all histories, notes or responsibility into the retained profile. If two matching records both contain necessary information, stop and review them individually rather than relying on removal to combine them. An export is a reference, not a promise that every relationship can be restored automatically.
Read the full contact profile
- Find the intended person in Contacts and open their full profile. Confirm the name, number and company first.
- Use Overview for the contact summary and next activity.
- Open Activity to inspect the available timeline. Match the event’s time and type rather than assuming every entry is a completed call.
- Open Appointments for that contact’s saved follow-ups.
- Use Details to review the record’s fields, responsibility and sharing context.
The full profile provides context beyond the quick-profile view. It does not give permission to change a record you cannot otherwise manage. If you cannot see the expected person or action, ask the account owner to check your access before creating another copy.
Wait for contact activity to load
Some profile sections load after the main contact details. A temporary loading indicator or dash in an activity count is not confirmation that the contact has no history. Wait for the section’s result and distinguish an empty state from a retrieval error.
For example, before calling a returning customer, review the latest relevant activity and the next appointment. This can reveal that a colleague already agreed to follow up. It does not itself schedule another call, complete an appointment or transfer ownership of the contact.
Keep changes attached to the correct person
Use the profile’s offered edit action to correct details, then save and check the result. Confirm responsibility and sharing separately. For a new appointment, follow the dedicated appointment workflow and verify its time; simply adding a note does not schedule a reminder.
If information differs from HubSpot, review sync direction and pending updates before overwriting both records. For missing activity, provide Support the contact reference, expected event type and time, without sharing the person’s whole history unnecessarily.
Reviewed 10 October 2026 against the current IllyVoIP Portal and implementation. Available controls depend on account permissions and service state.