
Prepare the destinations first
A telephone menu, or IVR, asks callers to choose where to go—for example, “Press 1 for Sales or 2 for Support.” Prepare the intended queues or SIP destinations first. Confirm who answers them and what should happen outside working hours.
Create the menu
- Open Voice Agent Studio and create or choose the flow you intend to configure. Do not overwrite a live agent just to experiment.
- In Call Flow, add the Menu step or review the menu-based example. Replace example wording and unselected destinations before publishing.
- Write a short greeting with the exact choices you configure. For this example use 1 for Sales and 2 for Support.
- Choose the input mode. For a keypad-only experience, use DTMF; if speech input is enabled, configure its next step deliberately as well.
- Connect each choice to a transfer step and select its actual queue or destination. A step named “Sales” does not by itself select the Sales team.
Handle callers who do not choose
Set the input timeout and review both the no-input and invalid-input branches. Decide whether the caller hears the menu again, reaches a person or the call ends. Avoid repeatedly replaying the same prompt without a useful exit. Review business hours and the after-hours path separately.
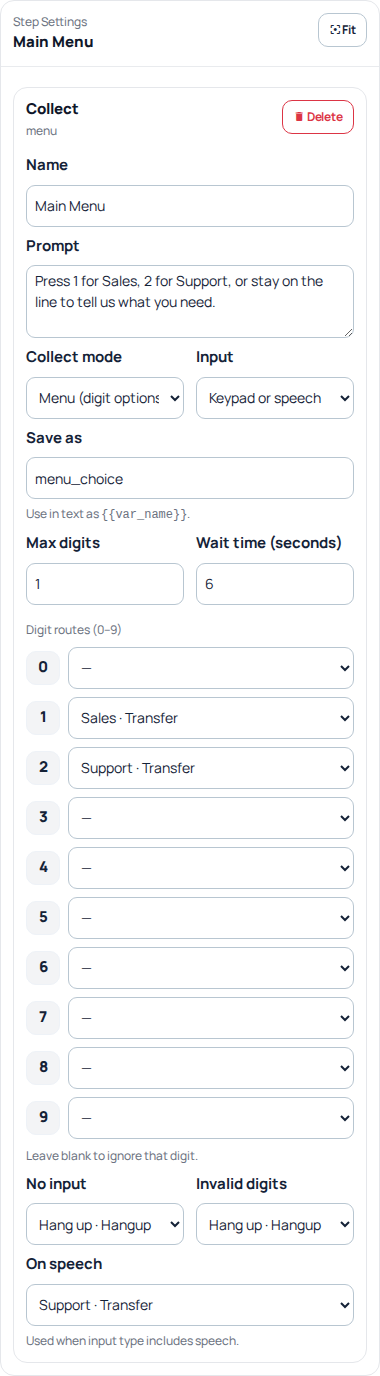
The built-in menu example exposes the prompt, input mode, digit routes and fallback branches. In this unsaved illustration, invalid digits and no input lead to Hang up; speech leads to Support. Review each branch and the actual transfer destinations for your own service before publishing. No agent or live route was saved. Open the image for a larger view.
Publish and test
Use the simulator to check branches, then save and Update or Publish as offered. Resolve validation errors and confirm the published state before selecting the flow on an incoming phone number. A saved draft is not proof that callers hear the change.
With permission, make real test calls: press 1, press 2, enter an invalid choice, give no input and check the after-hours path. Confirm that the intended phone rings and two-way audio works after transfer. Tests can incur normal call charges. Record the public call reference for unexpected behavior.
See queue setup, AI agent setup and incoming number routing.