
To connect a Poly Edge E220 or E350 directly to IllyVoIP, enter your SIP line's server, username and password in the phone's SIP setup, match the connection and audio settings, and check registration. To receive calls on an IllyVoIP phone number, you must also save that number's incoming destination separately.
This guide covers a phone you administer yourself, using password-based SIP authentication. The documented menu path is based on HP's Poly Voice Software (PVOS) 8.3.0 administrator guide; it is not a claim that 8.3.0 is the latest release. Check the guide for your installed firmware before changing a managed device. If your phone registers to an office PBX, configure the IllyVoIP trunk on that PBX instead of replacing the phone's extension account.
Poly Edge E220 vs E350: what changes in setup?
Both models use the Edge E family setup workflow. For network planning, the important distinction is that the E350 supports Wi-Fi and Bluetooth; the E220 supports Bluetooth but not Wi-Fi. Bluetooth support does not mean the phone can join your wireless LAN. HP documents this distinction in its Edge E user guide.
For a first setup, a wired network connection makes it easier to separate SIP configuration from wireless-network problems. If you use Wi-Fi on the E350, prepare the permitted wireless network and power arrangement first. Keep the phone on a network from which its administrator can reach it.
Before you begin
- An IllyVoIP account with an available SIP line and permission to view its connection details.
- The line's SIP username, SIP password, regional server hostname and supported port/transport combination.
- Administrator access to the phone and a computer on the trusted local network.
- The phone's exact model and installed firmware version.
- An eligible outgoing caller ID, the intended routing package and enough available balance for any test calls.
If the phone belongs to an employer or was provisioned by a previous provider, ask its administrator how it is managed. Do not factory-reset a working phone or remove its provisioning information simply to follow this guide. Record the existing line settings privately before changing them, and arrange the work when the phone is not handling calls.
You do not need to purchase an incoming number merely to enter SIP credentials and register a phone. Receiving calls from the public telephone network requires an active number with the appropriate destination, described below. Calling availability also depends on the account's permissions and service state.
1. Collect the correct IllyVoIP SIP details
Open Services → SIP Lines and select the identity this phone should use. Expand Technical endpoints to check the current regional hostname and supported connection settings. Use the details for that exact line, not a coworker's credentials or an old screenshot.
The SIP password is separate from the Portal login password. A phone label such as “Reception” is also separate from both the SIP username and the outgoing caller ID. Keep those three purposes distinct when completing the phone's fields.
This walkthrough uses a password-authenticated line. If the selected line uses IP authentication, do not switch it without checking which devices depend on it. Review Create and manage SIP lines for the account workflow and any applicable subscription terms.
2. Open the Poly web interface
On the phone, open Settings → Status → System Information to find its local IP address. Enter that address in a browser on the trusted network, select Admin, sign in with the administrator password and open Simple Setup. HP documents these steps in its PVOS 8.3.0 administrator guide.
Verify that you reached the intended phone before entering credentials. Its local IP address is the address of the device you are administering; it is not the IllyVoIP SIP server address.
If the page is unavailable, check network access with your administrator. The phone's management interface may be restricted by policy. Avoid repeated password guesses, public port forwarding or changing security settings just to gain access. A locked or centrally managed device needs its owner's cooperation.
3. Map your SIP account to the phone's settings
In Simple Setup, HP groups the connection settings under SIP Server, SIP Outbound Proxy and SIP Line Identification. Use the mapping below for the selected line. Labels within these groups can vary with firmware; the account values come from IllyVoIP.
| Setting or purpose | IllyVoIP value to use |
|---|---|
| SIP Server address and port | The current regional SIP hostname and matching port from Technical endpoints. Do not paste a Portal URL or the phone's local address. |
| Registration address / SIP identity | The selected line's SIP username. If your administrator's template requires a full SIP URI, confirm the domain from the line's connection details. |
| Authentication user ID | The line's SIP username or explicitly supplied authentication ID, not your email address or desired caller ID. |
| Authentication password | The SIP password for that line. Do not use the Portal password. |
| Display name / line label | A recognizable description for the phone. This does not authorize an outgoing caller-ID number. |
| SIP Outbound Proxy | Use a proxy only when required by the current connection instructions or your administrator's approved setup. Do not invent a proxy or copy one from another provider. |
| Signaling transport and call audio | A supported transport/port combination and an audio mode that match the IllyVoIP line. Review the next section before saving. |
For administrators working with Poly configuration templates, registration identity and authentication identity are separate concepts. Poly documents the registration address and authentication parameters in its PVOS 8.2.1 parameter reference. Use the reference that matches your deployed firmware; this table is not a ready-to-import provisioning file.
Do not replace a working PBX or provider account by accident. If several line identities are configured, keep track of which one you are editing and which line key will be used for the outgoing test.
4. Match caller ID, transport and audio
Choose the outgoing caller ID on the IllyVoIP line according to the modes your account and package permit. An owned number, a verified external number and a fixed custom number have different eligibility requirements. With dynamic caller ID, the phone's supplied value must still be allowed. See Choose and verify your outgoing caller ID.
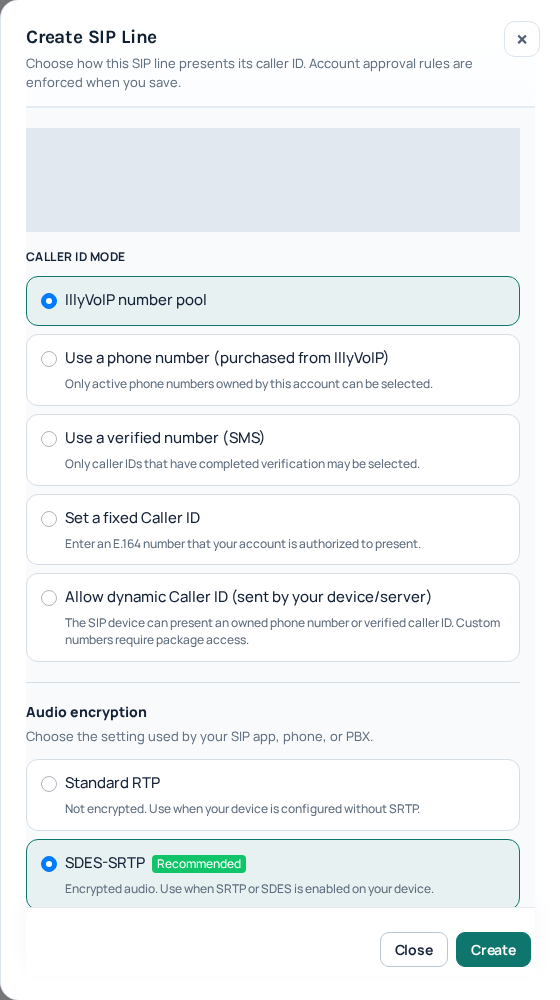
Signaling and audio are separate. TLS protects signaling; selecting TLS does not itself enable encrypted audio. Standard RTP, SDES-SRTP and DTLS-SRTP are distinct audio modes. Match the phone's supported configuration to the line rather than copying the setting selected in this screenshot. If you cannot confirm a compatible mode, ask your administrator before making the change.
Use the SIP hostname for TLS, not a substituted IP address. Avoid treating a certificate error as a reason to turn off validation. Confirm the hostname, device time and supported firmware/certificate configuration with the administrator.
5. Save and check registration
Select Save after reviewing the Simple Setup values. Allow any requested apply or restart action to finish, then check the selected SIP line's registration state. Do not interrupt an active call to apply configuration.
If the line does not register, compare the server, username and password with the current Portal details first. Check for accidental spaces, a password from a different line or a transport/port mismatch. Registration is a useful first checkpoint; it does not prove that outgoing calls, caller ID or incoming-number routing are correct.
6. Test an outgoing call
- Select the IllyVoIP line deliberately if the phone has multiple accounts.
- Dial an ordinary number you control in the international format required by your setup, including its country code.
- Confirm that the intended phone rings and check the received caller ID.
- Speak in both directions to confirm microphone and speaker audio, then end the call.
- Open Analytics → Call Reports and find the matching time and destination.
A connected test can incur normal charges. Do not use an emergency number as a test destination. If your calling workflow uses a technical routing prefix, copy the current prefix for the eligible package and apply it once; do not guess from an old guide.
A registered phone can still have a call rejected because of number format, caller-ID eligibility, account restrictions, balance or routing. Use the report's outcome and explanation to narrow the cause. The rates and routing guide and Call Reports guide explain those checks.
7. Route incoming calls to the phone
Registration does not automatically assign a public phone number to this device. Open Services → Phone Numbers, select the active number and review its saved destination.
For direct delivery to this phone, choose the intended SIP identity where that option is available and save. If the number points to a queue, voice agent or PBX, review that workflow instead; changing the destination can affect other people. For a phone registered to a PBX, the PBX must also match the incoming call and route it to the right extension.
Call the number from another phone and check ringing, answering and two-way audio. If it does not ring, compare the saved destination with the line actually registered on the Poly phone. Also check the phone's Do Not Disturb and forwarding state. Follow phone-number activation and routing for the current Portal steps.
Troubleshooting Poly Edge SIP setup
| Symptom | What to check next |
|---|---|
| The web interface will not open | Confirm the phone's current local IP, your network access and whether management is administrator-restricted. Do not expose the interface to the Internet. |
| The SIP line will not register | Recheck the selected line's credentials, regional hostname, transport and port. Record the exact error before changing more settings. |
| Registered, but outgoing calls fail | Check the final dialed number, selected line, balance, caller ID, package and destination policy. Registration alone does not authorize every call. |
| Outgoing calls work, but incoming calls do not ring | Check number activation and saved destination, then phone availability, forwarding and any intermediate queue/PBX route. |
| The call connects with one-way audio | Check the audio mode and device/network path. Review RTP/SRTP compatibility and NAT/firewall behavior with the administrator instead of opening all ports. |
| The wrong outgoing number appears | Compare the IllyVoIP caller-ID mode with any number supplied by the device. A line label does not change caller-ID permissions. |
| Settings change back later | Ask whether central provisioning manages the phone. Coordinate changes through the authoritative configuration rather than repeatedly editing the local page. |
| No Wi-Fi option on an E220 | The E220 does not have the E350's Wi-Fi capability. Use its supported wired network connection; Bluetooth is not Wi-Fi. |
The browser-based Connection quality test can provide a useful comparison, but it does not test the Poly phone's own network path or real call audio. When asking Support for help, include the model, firmware, symptom, time and timezone, plus a public call reference if available. Remove passwords, authorization headers and unrelated customer information from screenshots or logs.
Frequently asked questions
Do I need a PBX to use a Poly Edge phone with IllyVoIP?
This workflow connects an independently administered SIP phone directly to an IllyVoIP SIP line. If your office already uses a PBX, keep the phone's extension configuration and connect IllyVoIP through the PBX's trunk workflow instead. Choose one architecture deliberately.
Can I use my Portal email and password on the phone?
No. Use the selected SIP line's connection credentials. Your Portal login controls access to the account; it is not the phone's SIP authentication identity.
Will registering the phone make my IllyVoIP number ring on it?
Only if the active number's saved destination leads to that SIP identity or to a workflow that reaches it. Check registration and incoming routing separately.
Can I use the same instructions for a Poly VVX phone?
Use the model-specific guide rather than assuming the interfaces are identical. We have a separate Poly VVX 500 setup guide. Check the firmware and management policy for the device you actually own.
Documentation and verification scope
Reviewed on 7 October 2026 against HP's published setup documentation and the current IllyVoIP Portal workflow. The primary menu reference is PVOS 8.3.0; linked parameter references are version-labelled. Newer firmware can change available controls. Use the linked HP manuals for the documented versions and check with your administrator before applying these steps to a different release.
This is a documentation-based setup guide, not a claim that a physical E220/E350 was tested on IllyVoIP. The Portal image is a reviewed, privacy-safe October 2026 capture. HP's illustrated manuals are linked directly; no authenticated Poly interface screenshot is reproduced here.