
Use an AI step in Call Flow when callers should describe what they need instead of choosing a keypad digit. The step asks a question, listens and uses your routing options to choose a connected next step. Clear labels and working destinations matter as much as the prompt.
1. Plan the choices before opening the editor
Choose a small set of distinct caller needs, such as Sales, Existing service support and Billing questions. Decide where each goes and who is responsible for answering. A route label is not itself a telephone number, queue or transfer. Prepare the destination steps first, using only destinations available to your account.
Avoid overlapping labels such as Help, General help and Support. If a human must handle an uncertain request, plan a useful fallback in the surrounding flow. Do not imply that speech recognition will classify every phrase correctly or use routing intent as proof of a caller’s identity.
2. Add and configure the AI step
- Open the intended agent in Voice Agent Studio → Call Flow. Keep unrelated working branches intact.
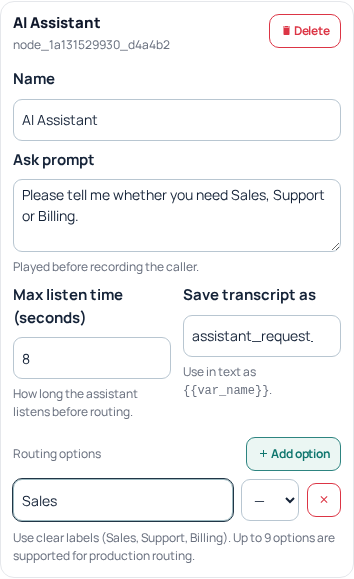
- Choose the AI step in the node-type selector, select Add Node and open its settings. Give it a name that explains its job.
- Set Ask prompt, for example: “Please tell me whether you need help with a new service, an existing service, or a billing question.” Adapt the options to your business.
- Set Max listen time (seconds) within the offered 1–30-second range. Choose a practical interval; a longer limit does not guarantee better classification.
- If needed, set Save transcript as to a descriptive variable such as
routing_request. Do not use the collected text as an authenticated account identifier.
3. Connect each routing option
- Under Routing options, select Add option. Enter one clear label and choose the intended next step.
- Repeat for the remaining distinct choices. Production routing supports up to nine options; use fewer when that makes the task clearer.
- Check each destination selector. A label without a valid next step is incomplete even if the canvas looks tidy.
- Connect the preceding Start or greeting step to this AI step. Follow each choice through to its final handoff, message or end state.
4. Review difficult conversations
Write a few example phrases for each route, plus an unrelated request, silence and “I want to speak to someone.” Check what the configured surrounding flow does when the request is incomplete or unrecognized. The AI step does not display the same keypad “Invalid digits” control as a Collect menu, so do not invent a digit-style fallback setting here.
Where a predictable explicit choice is necessary, a keypad menu may be more suitable. Use the existing menu guide for that configuration. Do not add a made-up “Anything else” option and assume it is a guaranteed catch-all; confirm actual behavior during acceptance.
5. Apply and verify the route outcomes
Close the step editor with its offered save/close control, then finish the parent agent’s Update or Publish operation. Wait for completion. A changed canvas in the browser is not yet proof that incoming calls use it.
During authorized calls, try the prepared phrases and record which destination actually rings. Verify two-way audio and the closed-hours result separately. If the wrong team receives a call, compare the spoken request, labels, connected step and report before changing several settings at once. Preserve a sanitized public call reference for Support. A successful publish proves configuration acceptance, not perfect intent classification.
Related guides
- Prepare an AI voice agent
- Build a telephone menu for Sales and Support
- Connect Voice Agent flows, integrations and reports
- Configure an inbound queue
Reviewed 12 October 2026 against the current IllyVoIP controls, implementation and applicable references. Available options depend on account permissions and service state.